Product information
Gothic Tunnel Crossbars
out of 5 stars
Product options
Selected
IMPORTANT—PLEASE READ: If you need Crossbars for a Caterpillar Tunnel purchased prior to 10/1/23 (68-in), please purchase 5-ft spacing Wind Bracing instead. If your tunnel was purchased after 10/1/23, the current Crossbar (88-in) product will work for you. Please reach out to Customer Support if you have any additional questions.
50-ft Kit has 9 crossbars
100-ft Kit has 19 crossbars
50-ft Kit 4′ Spacing has 11 crossbars
100-ft Kit 4′ Spacing has 24 crossbars




Questions about the Gothic Tunnel Crossbars
All support articles- Open the full article
Yes! See our available end wall options here.
- Open the full article
There is no official wind rating on our tunnels. The caterpillar tunnel is designed to be a moveable structure. Therefore, it is inherently not made to withstand high winds.
A tunnels ability to withstand wind is based on at least 6 factors:
- Soil type
- Water Saturation
- Bracing
- Anchoring Selection
- Wind Direction
- Customer Installation
Soft soils have less grip on the anchoring materials, while more compact soils hold better.
Related to soil type is ground saturation. How wet is the soil at the time of said wind event? Saturated soil will be more likely to let go of the anchors.
The standard caterpillar tunnel is stabilized by a nylon purlin strap. Accessories that increase rigidity while maintaining the caterpillar attribute of moveable are: Steel Center Purlin, Wind Bracing, and Spring Wire.
Anchoring options that exist for caterpillar tunnels are rebar, cemented ground posts, and Earth Anchors. Rebar is the most economical industry standard effective in moderate winds. Cemented ground posts eliminates the Caterpillar Tunnel strength of temporary, but provides a rock solid foundation. Earth Anchors are an expensive ground screw option that holds like concrete but is easily removed and reused.
Tunnels have also been reported as having problems with the plastic being blown to one side from broadside winds. Spring wire is a solution to aid in preventing this occurrence.
Customer installation is the final factor. Assuming all instructions are followed and installation is correct, the standard tunnel can withstand light winds and moderate gusts.
With all that said, our standard tunnels have withstood winds up to 50+ miles per hour. In the cases where similar winds have damaged tunnels, the six factors must be analyzed.
The prudent grower would do well to evaluate these six factors in light of their budget, short and long-term farm plan, and specific growing context.
- Open the full article
Yes! We have an excellent resource we've developed to help you apply for (and win!) your first NRCS High Tunnel Grant. See the link below:
- Open the full article
Below are the measurements of the inside height of our tunnels at specified distances from the edge of the tunnel.
Note: All measurements are in inches.
Inside dimension of 14-ft wide Caterpillar tunnel Gothic Gothic Pro Gothic Ground Post Classic Classic Pro Classic Ground Post 1 foot 54 70 72 48 64 82 2 feet 72 88 90 65 81 99 3 feet 79 95 97 74 90 108 4 feet 92 108 110 77 93 111 5 feet 97 113 115 85 101 119 Center 108 124 126 92 108 126 Cross Brace 81 97 99 N/A N/A N/A
Inside dimension of 16-ft wide Caterpillar tunnel
Gothic Gothic Pro Gothic Ground Post Classic Classic Pro Classic Ground Post 1 foot 43 59 61 42 58 76 2 feet 61 77 79 64 80 98 3 feet 75 91 93 72 88 106 4 feet 82 98 100 80 96 114 5 feet 89 105 107 87 103 121 6 feet 95 111 113 93 109 127 Center 110 126 128 96 112 130 Cross Brace 88 104 106 N/A N/A N/A - Open the full article
Yes. Currently we offer ground posts that should be permanently cemented on the corner poles and every other bow. This elevates the tunnel 12"-18". This set up kit includes brace bands with bolts to attach carabiners for rope guides.
A 16” (.4m) lift kit will still use the rebar and anchor plates. Below is a video on how they work.
- Open the full article
There is a firm but comfortable stretch of six inches (.2m) on each side of the 14’ (4.3m) width. Making the tunnel capable of 13’6” and 14’6” (4.1m-4.4m). It can be pulled outside of these parameters, but it is not a recommended practice by Farmers Friend.
- Open the full article
All 14-ft wide Classic Caterpillar Tunnels are made with our lighterduty 17-gauge steel, while our 16-ft wide Classic’s are made with our strongest 14-gauge metal bows.
All Gothic Caterpillar Tunnels widths (14-ft and 16-ft) are made with our strongest 14-gauge metal bows.
All solid center purlins and wind bracing pieces are all 1 3/8” (3.49cm) in diameter and 17 gauge steel.
- Open the full article
No — the caterpillar tunnel isn't built for inflation. A double-layer system needs the poly locked into channel on both sides and both ends so the air pocket stays sealed, and it needs a frame anchored to take the extra load. The caterpillar tunnel holds its single layer with rope tensioned over the bows, which is what keeps it lightweight, affordable, and movable. There's no continuous seal to hold air, so a blower would just push air out the edges without ever inflating the layers.
If you want a double-layer structure, that's what our high tunnels are built for. The Double Layer Inflation Kit is available for Haven and Guardian tunnels in lengths from 24 to 120 feet, and it includes everything you need: the blower, mounting bracket and deflector, inflation hoses, couplers, spring wire, greenhouse repair tape, insect screen adapter, and a new roll of clear plastic for the second layer (more transparent than our standard poly, so you keep light levels up with two layers).
- Open the full article
The most up-to-date Caterpillar Tunnel manual can be found here.
- Read the full article
Yes. However, below are some variables to consider, and caution with prudent planning is highly encouraged. These are only our guidelines and not a guarantee.
Tunnel Orientation
You can install the tunnel perpendicular or parallel to the hillside. It is not recommended to trellis on an installation that is parallel to the hillside with a grade that exceeds three percent. This is due to gravitational pull from the weight of trellised plants on the bottom end of the tunnel.
With an installation that is perpendicular to the hillside, one could install a basic tunnel with no trellising on up to twenty-five percent grades.
Prevailing Winds
As far as prevailing winds, an installation of the tunnel parallel to the wind is best. The tunnel will more naturally shed the wind. In a perpendicular installation, in reference to the wind, the side plastic will have a tendency to catch wind and lift.
This is exacerbated when the tunnel is on a hillside with prevailing winds whipping down the hill side. In this situation, one could still install a tunnel, however, it is recommended to seal off the uphill windward edge by burying the plastic. This will help prevent erosion and water shed inside of the tunnel as well. See attachment.
Land Grade
We do not recommend exceeding a twenty-five percent land grade (For Caterpillar tunnels), and no more than 3% (for Guardian and Haven High Tunnels, due to roll up sides and baseboards needing to be very level). How do you determine your land grade? All you need is a 50” board, level, tape measure, note-taking device. Watch this video to see these tools in action.
Erosion
The cardinal issue of growing on a hillside is erosion. Contoured rows, terracing, ditching, and raised beds are ways to mitigate erosion. In planning, the grower can incorporate tunnels into their hillside growing.
In order to execute this, depending on the grade, you will need to cut the lift kit on the high side to compensate for the grade, or remove the lift kit from the high side and combine it with the low side after cutting it to the appropriate length.
- Read the full article
The quick answer: 10–15 feet between tunnels is ideal. At minimum, allow at least one tunnel height, or 8–10 feet. They can be placed closer, but the variables below should factor into that decision.
Orientation and sunlight
Tunnel orientation gets more stress than it deserves. The general consensus — particularly for growers in the northern third of the US — is to run tunnels east-west, but the lay of your land and drainage should take priority over compass direction. If you're on a slope, run your tunnels with the slope rather than across it. My family's farm in Middle Tennessee, Bountiful Blessings Farm, has tunnels facing multiple directions and has never had a production problem attributable to orientation.
For spacing specifically, the concern is shadows cast by a neighboring tunnel. How much that matters depends on your growing season and crop selection — shading is mostly a winter issue, when the sun sits low, and it's less of a factor in the mid-latitudes and South. If you want to dig into this, see Which Direction Should Your Beds and Tunnels Face?
Rain
Tunnels create a watershed for neighboring tunnels and crops, which can cause flooding or seed erosion for direct-seeded crops on outer rows. Soil type, lay of the land, and typical rain intensity all play a role. With soils that absorb water better and areas with less intense rain, tunnels can be placed closer together. Planting a cover crop in between helps with water absorption and weed management.
For example, one customer positioned their tunnels with only a twelve-inch walkway between them and planted a cover crop. This suppressed weeds and increased water absorption, preventing muddy conditions. Shadows weren't a concern given their orientation and crop selection.
Snow
Winter growers need to account for snow. When snow slides off the side of a tunnel, it builds up against the walls. Tunnels placed too close together form a ditch-like pocket where snow collects. Any snow you remove also has to go somewhere. Depending on snowfall amounts and machinery size, count on at least 8–15 feet between tunnels so you can clear snow from the side. The greater the typical snowfall, the greater the distance needed.
You may also find this article on snow useful.
Wind
Wind passing over and around structures can create a wind tunnel effect, increasing wind speeds well in excess of the actual wind speed. Spacing tunnels out or creating windscreens can help.
- Read the full article
Receiving large shipments like Caterpillar Tunnels or silage tarps from Farmers Friend is an exciting step for your farm. This guide is designed to help you understand the freight delivery process, what to expect upon arrival, and how to prepare for a smooth and efficient unloading. With the right knowledge and preparation, you’ll be ready to receive your shipment confidently and get back to what you do best—farming.
Delivery Method
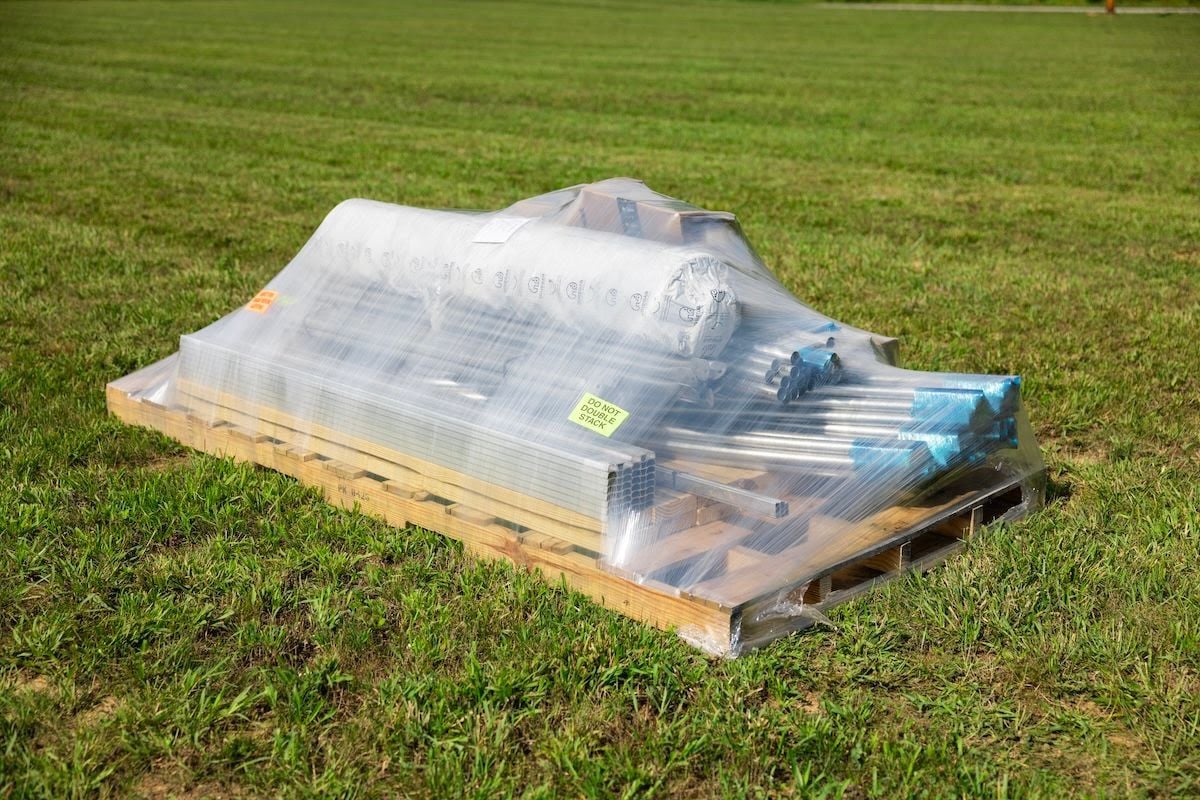
Our various Tunnels and other large products are shipped on a 4x8 wooden pallet via motor freight (an 18 wheel tractor trailer). Depending on the order, sometimes multiple tunnels can fit on one pallet. Below is an example of what a past shipment looked like.
Delivery Time
You will receive a pro number for tracking from Farmers Friend when your shipment is picked up from our facility. It is recommended that you contact the carrier prior to delivery to make arrangements for time and date. There is some flexibility in date and time of delivery, but customers in remote areas should accept delivery at the carriers convenience to avoid excessive delays or extra charges.
Change of Shipping Address
If a change of shipping address needs to be made before your order is picked up from our facility, no problem. However, if this change is made after your order is picked up from Farmers Friend, there will be a reconsignment fee which generally is around $100. Charges are determined by the carrier.
Verifying Contents
Prior to moving or unloading, please take pictures of the order. This is in case items are missing or damaged we have a way to verify contents and condition. We recommend conducting an inventory of the shipment with your included packing list as soon as possible after unloading.
Unloading
As far as unloading, it is the customer’s responsibility. The carrier will not have a forklift to unload. A forklift or tractor with forks works well but is not required, as the shipment can be unloaded by hand with two people. Simply cut and remove any bands or packaging. The individuals unloading should be capable of team-lifting 130 pounds. Out of consideration for the carrier, we request you prepare to unload as quickly as possible.
Farmers Friend does not schedule any shipments with liftgate services, and they are not included in any shipping charges, nor is it included with free shipping. If the local terminal or driver offers lift gate services, Please note that there will be an additional charge billed to you from Farmers Friend of $150.
Each pallet will not exceed 3000 pounds. Below are some estimated example weights:
Pallet
- 4'x8' Pallet — 100 lbs
Silage Tarps
- 24' Silage Tarp — 61 lbs
- 32' Silage Tarp — 83 lbs
- 40' Silage Tarp — 99 lbs
- 50' Silage Tarp — 124 lbs
Tunnels
- 14'x50' Caterpillar Tunnel — 350–675 lbs
- 16'x50' Caterpillar Tunnel — 580–650 lbs
- 14'x100' Caterpillar Tunnel — 750–900 lbs
- 16'x100' Caterpillar Tunnel — 950–1100 lbs
- Haven High Tunnel — 700–2750 lbs
- Caterpillar Tunnel Max — 770–2000 lbs
Damage
In the event of your shipment being visibly damaged, we recommend both the driver and you taking pictures. The driver should also note the damage on the Bill of Lading (BOL) and you should send pictures to Farmers Friend. If the damage is excessive (obvious multiple items missing/damaged, pallet has been re-packaged) please refuse the shipment and contact Farmers Friend. We will arrange for a replacement order to be shipped via a different carrier. If there are only a few items damaged/missing, please accept the shipment and Farmers Friend will gladly make arrangements for quick replacement.
What can delay my shipment and/or create extra charges?
Can a truck with a 53’ trailer (semi) safely drive into and out of my area/street/driveway without backing? If a carrier with a large truck can’t navigate the area/driveway there are other options:
- Smaller truck (additional fee applies). Fee is typically $500-$800 above regular shipping charges.
- Deliver to a business in the area that has a dock (reconsignment fee only applies if order is already shipped)
- Deliver to a business in the area that the carrier can safely allow for hand unloading (parking lot, gas station…) (Reconsignment fee only applies if order has already shipped)
- We can set the order for “Will Call” and deliver to a terminal for you to pick up at a scheduled time.
Island deliveries: Many carriers will apply a “Limited Access Fee” to an area that requires a ferry to access or has only 1-2 roads into/out of an area. Other options:
- You can choose to pay the additional cost for your order to be delivered by the carrier.
- We can set the order for “Will Call” and deliver to a terminal for you to pick up at a scheduled time. (Reconsignment fee only applies if order has already shipped)
- My tractor will only lift _?_ lbs.
- This could create the need for more than the standard amount of pallets to build the order. This will mean more material, handling, and space on the truck. The fees involved can be discussed with Customer Service as needed.
As always, if you have questions or concerns, please contact Farmers Friend Customer Service at 931-583-0397 or support@farmersfriend.com.
- Read the full article
The forecast for wind or snowstorms can give rise to anxiety for many farmers. How do you best prepare for these events? The tips below can assist you in reducing the chance of sustaining damage to your investment. As the elders say, “An ounce of prevention is worth a pound of cure.”
The wind is best prepared for by anchoring, bracing, breaks, orientation, and sealing. In anticipation of a forecasted wind event, loose items should be secured or stowed. Additionally, all hardware and rope or strapping should be inspected to ensure tightness and serviceability.
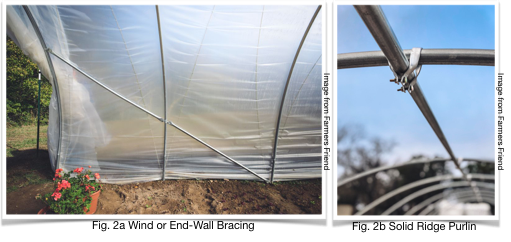
Anchoring. The most desirable anchoring for tunnels in sustained high wind contexts is either cement or ground anchors. Ideally, ground posts should be anchored on the corners and every other bow. The bows which are not anchored should be driven at least two feet deep. Traditional caterpillar tunnels with rebar should be secured using ground anchors in high wind contexts (see Fig. 1).
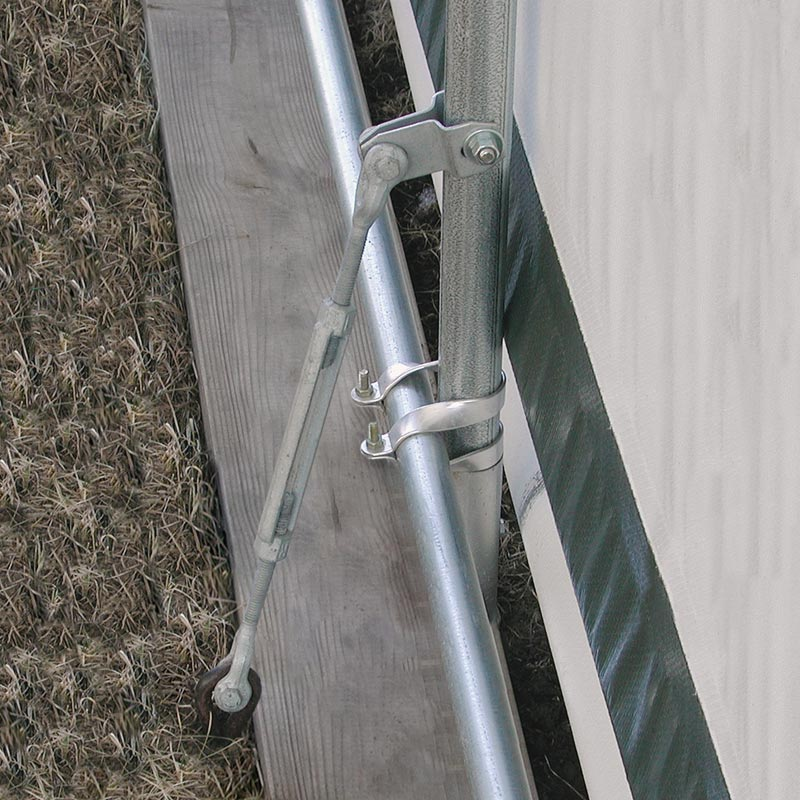
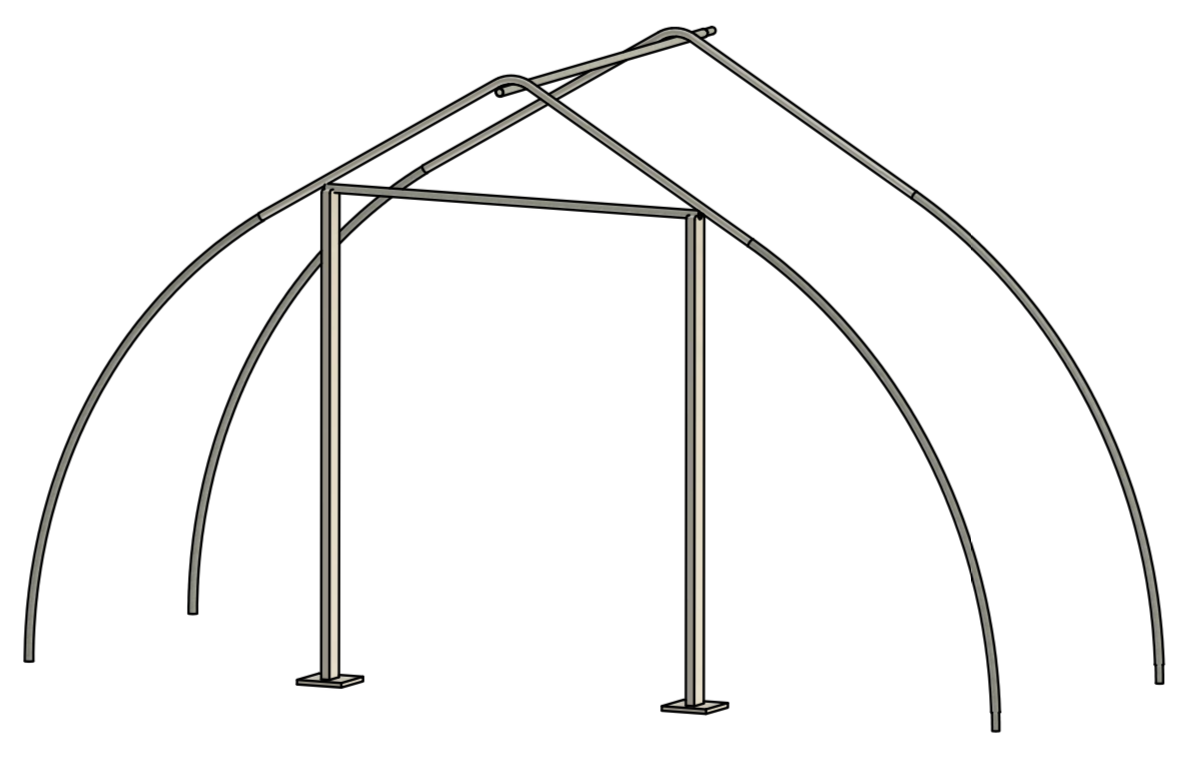
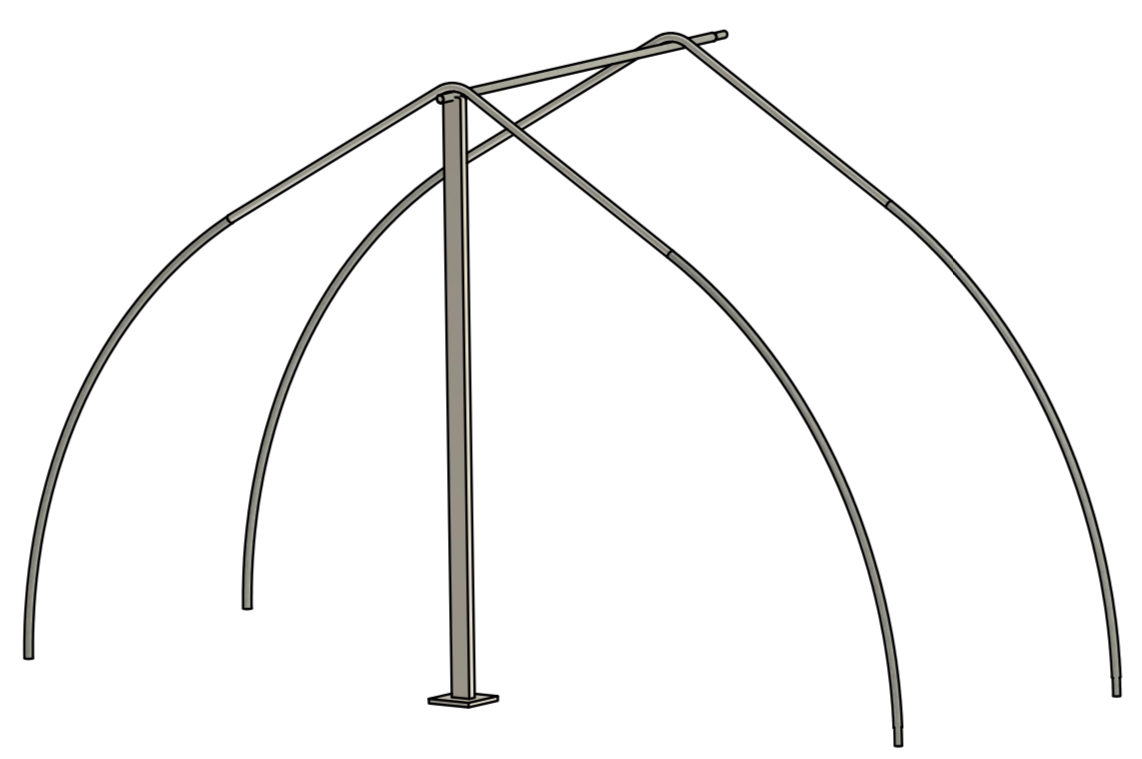
Bracing. Appropriate bracing for high wind includes wind or end wall bracing at each corner and a solid ridge purlin (see Fig. 2a and 2b). Wind bracing and purlin prevents racking of the tunnel from end to end. A lower profile tunnel is better in high winds. The lower profile is one advantage of caterpillar tunnels.
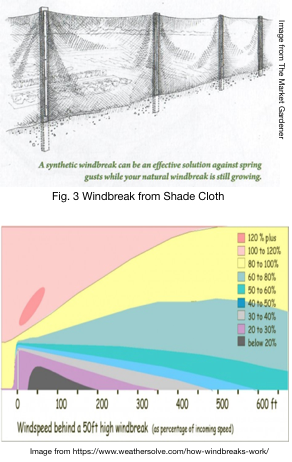
Breaks. Sustained high winds are the greatest danger to your tunnel. This does not negate the potential risk associated with gusting winds. One way to mitigate both types is by installing windbreaks if natural ones like trees are not present (see Fig. 3). Windbreaks can slow down the wind and offer a protected distance zone ten times its height.
Orientation. Understanding the wind pattern of your farm is important when choosing the orientation of your tunnel. Prevailing winds can be an indicator of how the tunnel should be positioned. However, wind can be unpredictable and orientation rendered useless. The ideal orientation is with the narrow end facing the prevailing wind. This makes the best use of anchoring and bracing while presenting a smaller profile for the wind to catch.
Sealing. Once you are in an actual wind event all openings should be closed. The side curtains should be dropped and secured with sandbags. If doors have been installed on the ends they should be closed and latched. If the ends are left open for summer ventilation a windbreak should be installed.
References
Bartok, J. W. (2018, August). Prepare your greenhouse for high winds. Retrieved October 17, 2019, from https://www.greenhousemag.com/article/tech-solutions-prepare-your-greenhouse-for-high-winds/.
Fortier, J.-M. (2014). The market gardener: A successful grower's handbook for small-scale organic farming. New Society Publishers.
Sparks, B. (2016, February 17). Tips to help reduce wind and snow damage at your greenhouse. Retrieved October 17, 2019, from https://www.greenhousegrower.com/technology/tips-to-help-reduce-wind-and-snow-damage-at-your-greenhouse/.
- Read the full article
The forecast for wind or snowstorms can give rise to anxiety for many farmers. How do you best prepare for these events? The tips below can assist you in reducing the chance of sustaining damage to your investment. As the elders say, “An ounce of prevention is worth a pound of cure.”
Snow and ice are best dealt with by shape, bracing, spacing, removal, and preparation. In anticipation of a forecasted windy winter event, loose items should be secured or stowed. Additionally, all hardware and rope or strapping should be inspected to ensure tightness and serviceability.
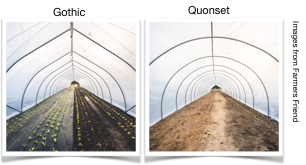
Shape. The best shape for shedding snow is a gothic peak. This is in comparison to a quonset or rounded peak. The steeper angle increases the chances of snow naturally sliding off, and makes it easier to remove the snow that does accumulate. This does not mean that the quonset peak cannot withstand snow loads. It just means that the snow is easier to remove.
Bracing. Appropriate bracing for snow and ice includes wind or end wall bracing at each corner and a solid ridge purlin (see Fig. 2a and 2b). It is recommended that only one overhead purlin be used, as two purlins create a holding pocket for snow. This increases the weight and likelihood of tunnel collapse or plastic damage. Wind bracing and purlin prevents racking of the tunnel from end to end.
Additionally, if a serious snowstorm is forecasted, one might consider shoring up the tunnel with notched 2x4’s that have 8inch x 8inch feet. For gothic peaks, this bracing should be wedged under the end of truss supports or under the ridge purlin. For quonset peaks, the bracing should be wedged under the purlin or in the center of the bow. It is recommended to place these every other bow or every fourth bow.
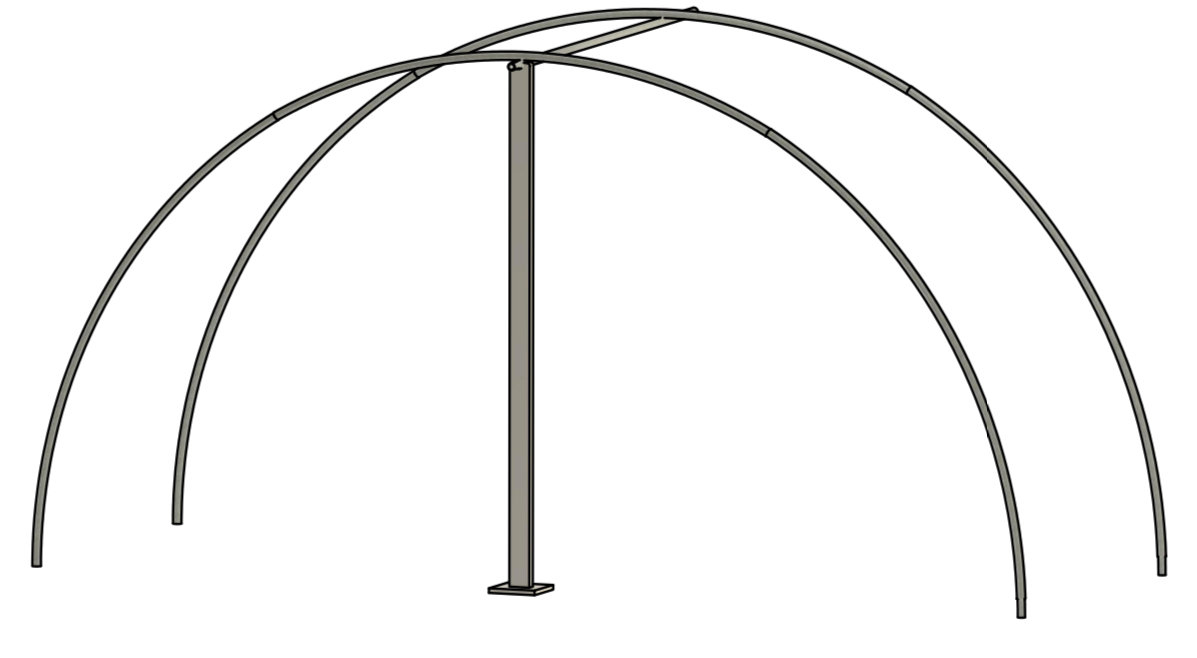
Spacing. The NRCS high tunnel initiative CODE 325 recommends that a minimum of ten feet or a recommended twenty feet around the tunnel be clear of obstructions. This is to allow space for snow removal equipment and room for the snow which is removed from the sides of the tunnel. The uneven pressures created by snow buildup on the sides unevenly because of neighboring obstructions or uneven removal from each side is a common reason for tunnel collapse.
The spacing between neighboring obstructions or tunnels is not the only span to be concerned with. Decreasing the space between each bow (also known as rib or arch) is one way to increase the high tunnel strength. Generally, in areas with snow events, the bows should be spaced four feet apart.
Removal. The weakest part of the tunnel from end to end is in the middle. This is because there are no end wall braces or anchoring. High tunnels are most stable when there is an even amount of snow build up on each side. Before removing the snow from the top of the tunnel, you should remove it from the sides by shoveling or using a snowblower.
Snow and ice can be removed from inside the tunnel by bumping the bows or pushing up the plastic. This can be accomplished with a soft bristle broom or a long handle with a tennis ball on the end. Start at the bottom and work your way up. If you start at the top, the snow will have nowhere to go. Doing this from inside the tunnel is preferred as you can alternate from one side to the other easily.
Sometimes snow cannot be removed from the inside. To remove snow from the outside, tie knots in a rope every couple of feet. Toss the rope over the tunnel and with another person, drag the rope back and forth using the same principles mentioned above.
Preparation. You will find it prudent to keep a few items on hand. The lumber for bracing to shore up, soft bristle brooms or long handle with a tennis ball, back up poly for covering or patching, and greenhouse repair tape. Also, servicing snow blowing equipment in advance is wise.
References
Growing for Market. (2011, January 20). How to get snow off a hoop house. Retrieved October 25, 2019, from https://www.growingformarket.com/articles/snow-off-hoophouse.
Grubinger, V. (2014, December). Prevent greenhouse collapse. Retrieved October 24, 2019, from https://www.uvm.edu/vtvegandberry/factsheets/PreventGreenhouseCollapse.html.
Lemieux, A. (2011, March 15). Johnny's winter caterpillar tunnel structural trial. Retrieved October 21, 2019, from http://johnnystooldude.blogspot.com/2011/03/winter-caterpillar-tunnel-structural.html.
Natural Resources Conservation Service. (2018, October). High tunnel general specifications. Retrieved October 24, 2019, from https://efotg.sc.egov.usda.gov/references/public/AK/AK_325_High_Tunnel_General_Specifications_Oct2018.pdf.
Poling, B. (2016, January 22). Managing snow and ice with greenhouses and high tunnels. Retrieved October 25, 2019, from https://strawberries.ces.ncsu.edu/2016/01/managing-snow-and-ice-with-high-tunnels-12216/.
Rose of Sharon Homestead. (2019, February 12). High tunnel/greenhouse snow removal & vlog. Retrieved October 25, 2019, from https://www.youtube.com/watch?v=OG82-JokjrU.
Sparks, B. (2016, February 17). Tips to help reduce wind and snow damage at your greenhouse. Retrieved October 17, 2019, from https://www.greenhousegrower.com/technology/tips-to-help-reduce-wind-and-snow-damage-at-your-greenhouse/.
- Open the full article
You will receive the Zipper Door End Wall as a 11.5-ft tall and 17-ft wide sheet of tarp-like material. This kit is compatible with the 14-ft and 16-ft wide caterpillar tunnels.
The door itself is 7x7
- Read the full article
From time to time customers ask about tunnel maintenance in the winter when it is not being used for growing. This is a great question and the short answer is "it depends on your location and how much you want to work." Let's explain...
LEAVING THE TUNNEL UP
There are several reasons why leaving a growing tunnel up for the winter could be to your advantage. The main reason has to do with weather. If you live in an area that receives a significant amount of snow then leaving your tunnel up allows you to keep the ground relatively prepared for spring seeding and/or planting. Covered ground is usually not too wet and muddy in spring, requiring less work for planting. Because of the shape of the tunnel (usually quonset, rounded) snow does not usually build up excessively since it slides to either side. If you do leave your growing tunnel up for the winter you also need to winterize the water lines by disconnecting the water source and opening the ends of your irrigation lines to prevent the water from freezing and cracking your lines. Disconnecting a flush valve, filter and/ or any electronics (like a timer) and storing them inside would also be beneficial to prolong their life. On the other hand, of you live in a warmer climate that gets little to no snow leaving your tunnel up may work perfectly into your growing strategy as well as not require much extra work.
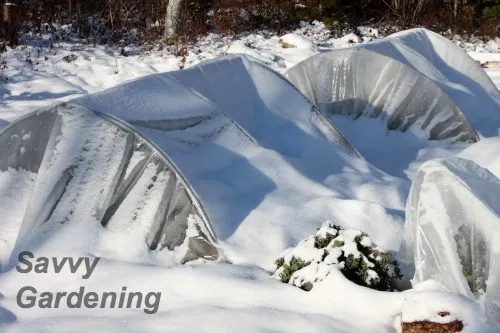
TAKING YOUR TUNNEL DOWN
If you decide to take your tunnel down for the winter you will incur a little more work, but it may be to your advantage. The biggest reason to take your plastic off and winterize your water lines would be to prolong the life of your plastic. By taking the plastic down and storing it inside you remove the weather factor (especially the sun) from deteriorating the plastic and add life to it. It may be possible to add several more growing seasons by removing the plastic, winterizing the watering lines and storing the flush valve, filter and any electronics.
The down side to removing the plastic, besides the work, would be the shape of the ground when planting season returns. Again, if you live in a place of significant snow your tunnel may be full of snow in April or even May when you might be ready to plant your cool weather vegetables. Instead of being covered all winter and ready to plant in spring you now need to clear the snow from your beds which will cause a muddy mess, let it dry and then prepare your beds for planting. On the other hand, if you live in a warmer climate that does not receive much, if any, snow taking your tunnel down might be a great way to preserve your plastic and increase your investment.
At the end of the day either decision is fine and depends on the amount of work you want to do and the place where you live. Whether you take your tunnel down or leave it up it would still be good practice to clear your water lines and store any valves, filters or electronics. Those are relatively easy to detach and reattach when ready. Happy growing!
See also this video from Curtis Stone from Canada and the amount of snow he sees.
- Open the full article
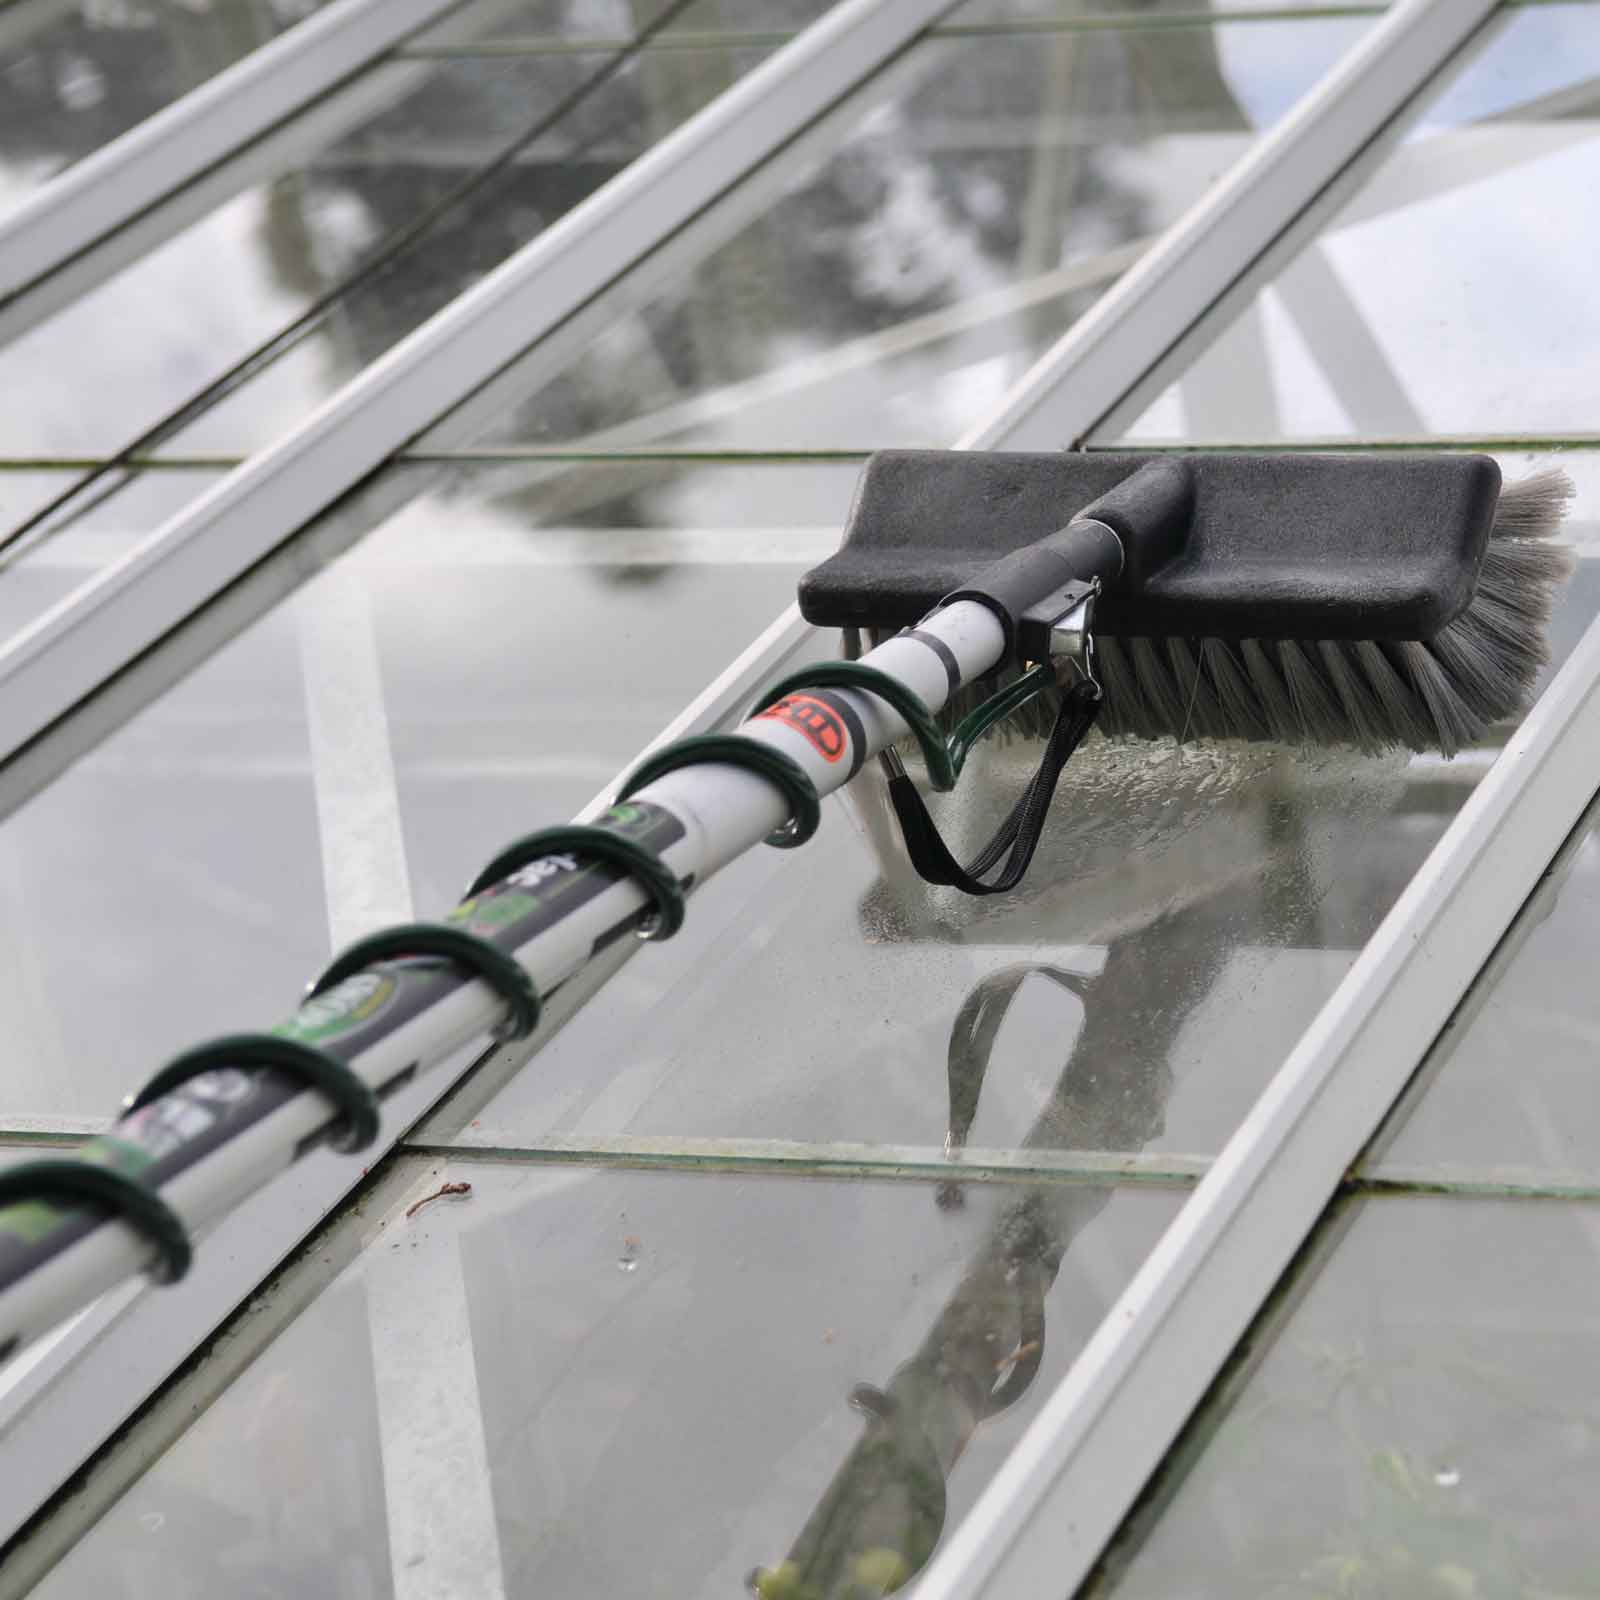
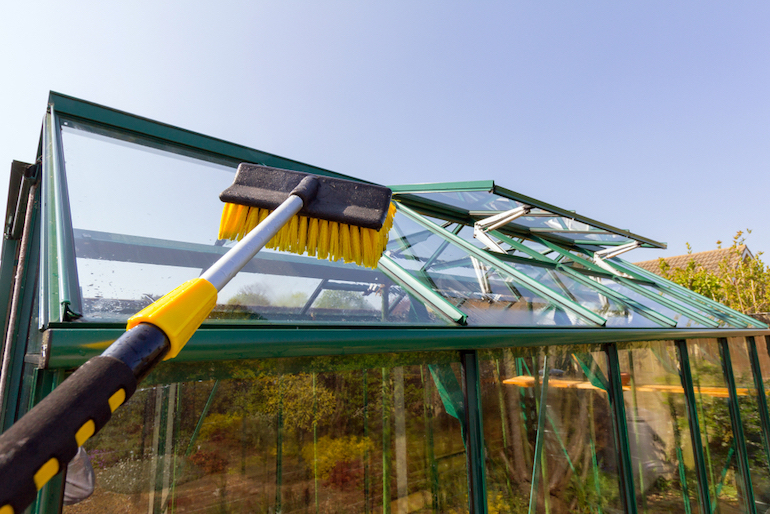
Depending on the placement of your tunnel, you may need to clean your tunnel plastic every so often. This is pretty simple but will require a bit of "elbow grease” if you are removing sap, dirt, or algae.
However, there are a couple of do’s and don’ts when it comes to choosing a method of cleaning.
Do not use bleach or anything abrasive on the tunnel plastic.
Bleach and many abrasives are simply too strong for the plastic and may deteriorate it over time. Also, they are usually toxic to the environment as well. Instead,
Use warm water with a mild detergent.
This method of cleaning is best applied with a soft-bristled brush or a telescoping flow-through brush and on a warm sunny.
Sanidate is also a great option for cleaning tunnel plastic: When diluted with water, Sanidate is a food safe solution.
Check it out on our website: https://www.farmersfriend.com/search/?q=sanidate
- Open the full article
As a general rule, Farmers Friend only ships tunnels internationally to Canada. However, there is a scenario where we are willing to make this happen for the customer.
In the case where a customer lives outside of the United States and Canada, we would be willing to ship their order to a freight forwarder of their choice. We will not quote the order for shipment outside of said countries. We can provide the customer with the shipping dimensions and weights for their order. We will not do custom size tunnels.
The customer needs to understand that Farmers Friend will not be responsible for items damaged or missing in their international shipment. In the event that an item is missing in shipment, we will ship the replacement to the original shipping address of the freight forwarder. The customer will be responsible for getting it from the U.S. freight forwarder address to their final destination.
- Open the full article
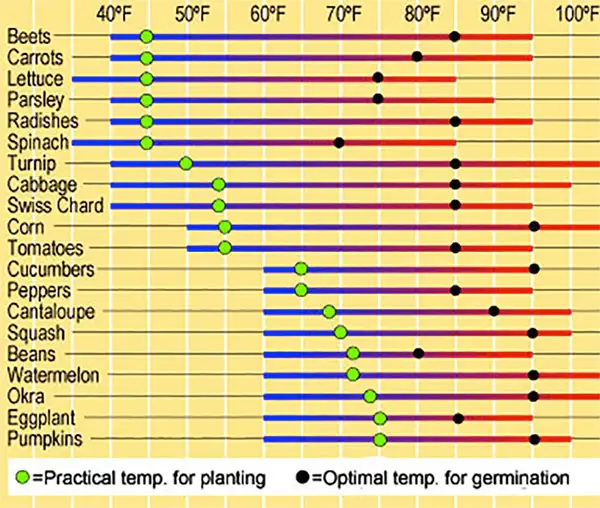
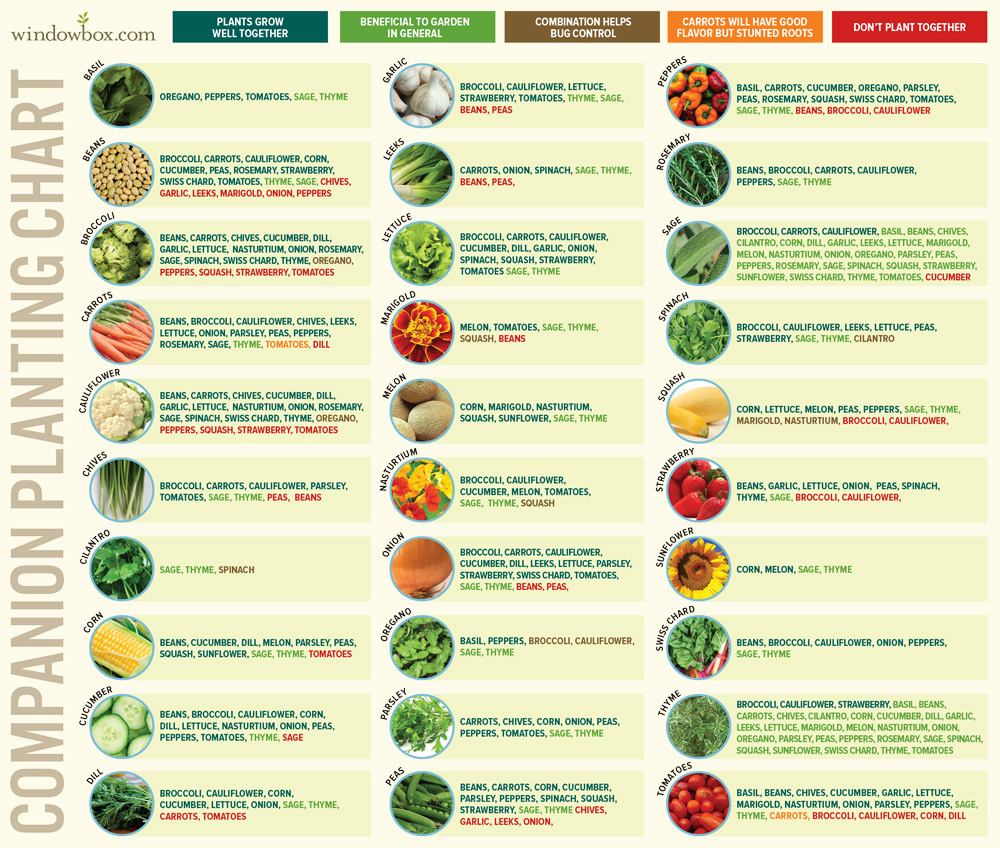
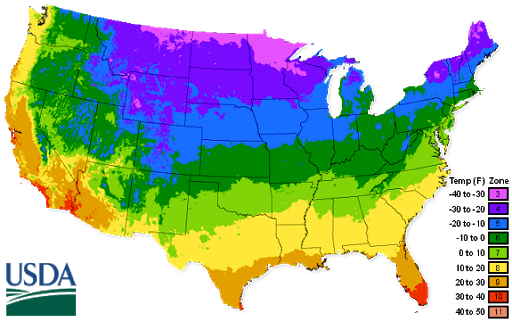
There are so many species of flowers and vegetables that it is sometimes difficult to remember the specific temperature tolerances of each plant, especially when you are new to gardening. These charts should prove helpful in not only planting and harvesting, but also what temperature different plants prefer or don't prefer. We have also included a companion planting chart to help you see what plants thrive together and which ones do not. As well as a USDA Zone Hardiness map. If you have questions about specific plants people will often ask what your zone is since their information will likely change depending on your specific zone.
Vegetable Planting & Harvesting Chart
Companion Planting Chart
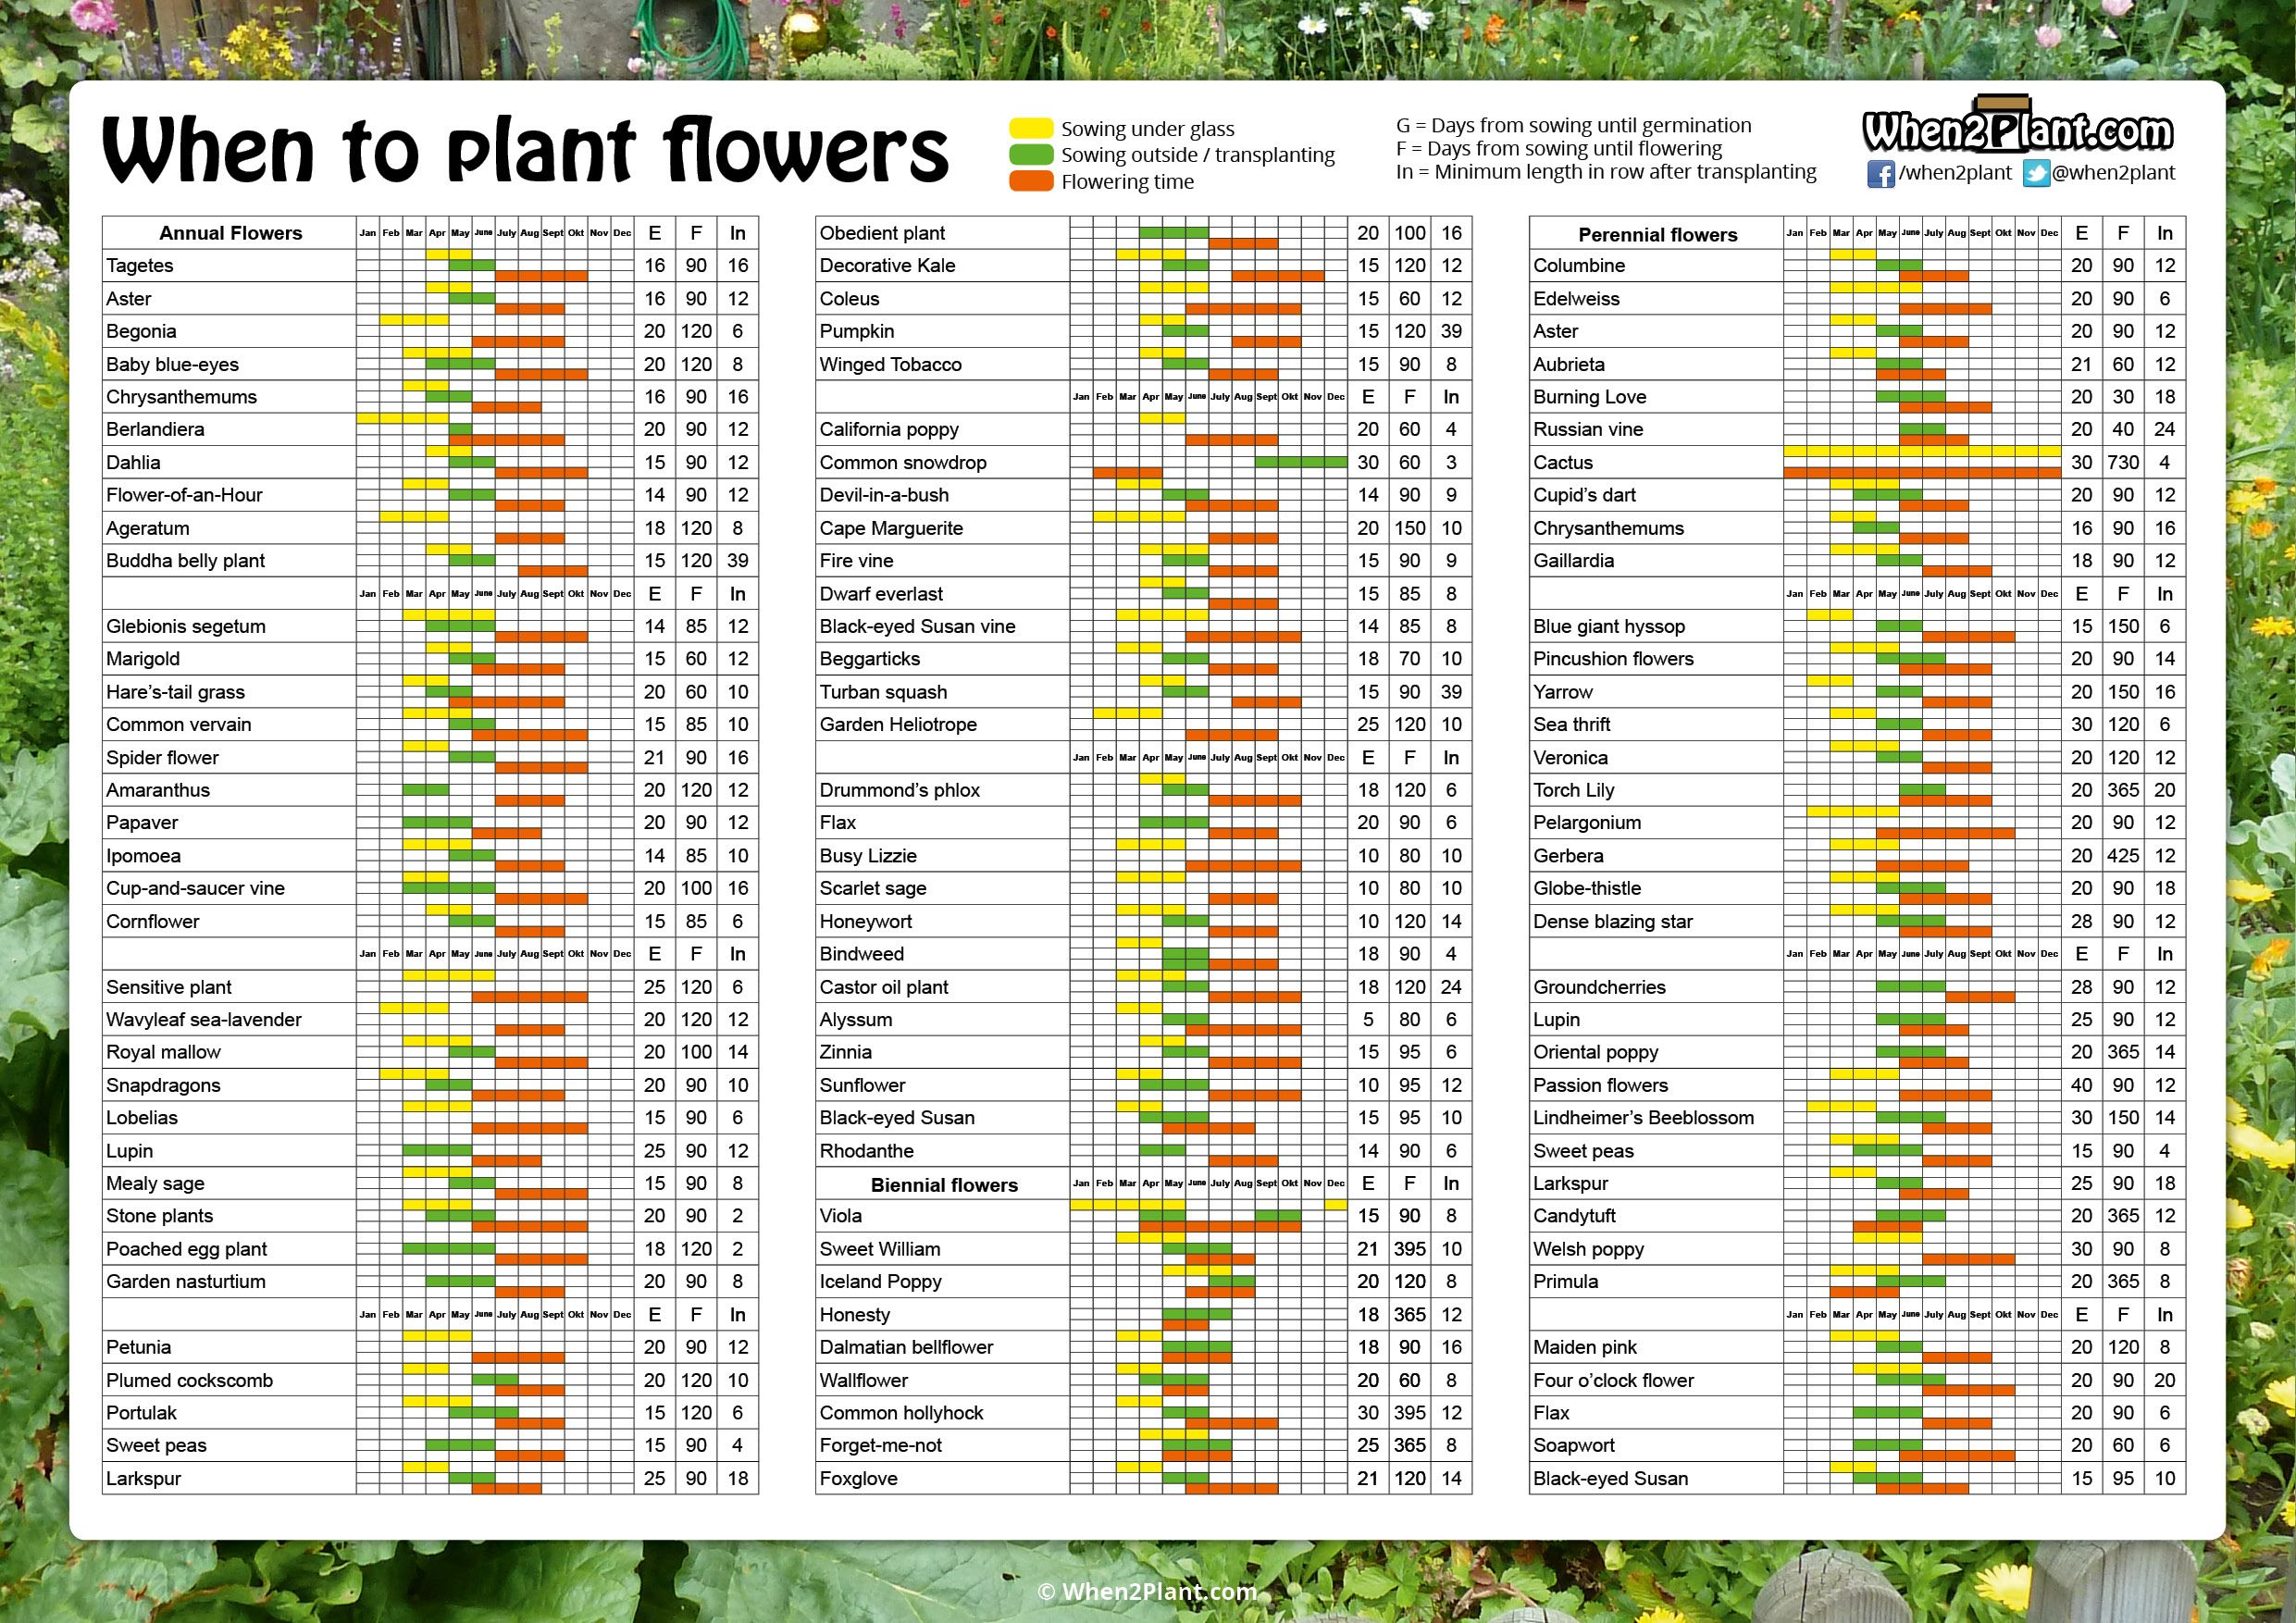
USDA Zone Hardiness Map
- Open the full article
When we think about caterpillar tunnels we think of temporary or movable structures that can be used for multiple things on a farm. While they are an inexpensive way to cover crops and animals or store equipment they do have their limitations. Most caterpillar tunnels have one center purlin for strength at the apex of the tunnel. While this is the usual setup, some have added additional purlins for stability and strength. This sounds like an obvious solution, but this is actually the opposite of the truth. When additional purlins are added to the left and right of a center purlin it often creates pockets where snow and water can accumulate instead of falling off of the side of the tunnel as with just one center purlin. The result is additional weight on the top of the tunnel and, in the worse case scenario, caterpillar bow failure. Look at this link to see a trial of this very question: Caterpillar Structural Trial
The center purlin design is the best way to shed weight and water off of the caterpillar tunnel and onto the ground. If additional support is needed in a caterpillar tunnel it is suggested to brace every other bow from the inside with 2 X 4's at the joint(s) you are concerned about.
We also recommend…


Product Reviews
Review data
5 star reviews
- 100%
4 star reviews
- 0%
3 star reviews
- 0%
2 star reviews
- 0%
1 star reviews
- 0%
Recent reviews
Gothic Tunnel Cross Bracing
5 out of 5 stars