Product information
Flush Valve - 3/4 Drip-Barb Adapter Combined
out of 5 stars
Product options
Selected

shipping

guaranteed

market farmers
The Irritec Flush Valve – 3/4 Drip-Barb Adapter Combined helps remove sediment and debris from drip irrigation lines to support cleaner water flow and improved system maintenance. Designed with an integrated 3/4-inch drip-barb connection, this flush valve assembly provides an efficient end-of-line solution for drip irrigation and drip tape systems.
Note: Product may have different color variations than what is pictured.


Irrigation questions
All support articles- Open the full article
The most up-to-date irrigation kit manual, which includes the overhead, drip, and field irrigation assembly instructions, can be found here.
- Read the full article
Sometimes, not all of the irrigation sprinklers will work. You may find that one or more sprinkler heads are not emitting water. Below are the steps to figure out what may be causing this problem and how to resolve the issue.
Check the Filter
A clogged filter could be restricting flow. A visual inspection of the filter will reveal if it is indeed clogged.
Solution:
#1: Rinse the filter clean and reinstall.
Check the Automatic Valve (if applicable)
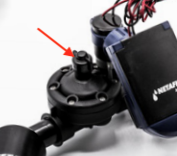
The automatic valve could be restricting flow. To open the automatic valve completely, with the system charged and emitting water, turn the knob located in the center of the diaphragm housing counter-clockwise. This will ensure the valve is completely open it if is not already in the full open position.
Check the Sprinkler Head
A clogged or malfunctioning sprinkler head could be the cause of your problem. To determine if this is the case, charge the system with water and note the location on a drawing of what sprinkler heads are not emitting water. Close the valve and then swap positions of those heads that were not working with those in another location that was working. you can leave the hanging assemblies in place and just move the sprinkler head and check valve.
Solutions:
#1: If the problem follows the sprinkler head, then replace the sprinkler head.
#2: If the problem does not follow the sprinkler head, you may have a water pressure or flow rate issue. Continue troubleshooting.
Note: Possible causes of clogging could be that the system was not flushed before the sprinkler heads were attached to the hanging assembly during the initial install. Also, a filter is required for this system. If no filter was installed, debris could be entering the system.
Check your Flow Rate
The flow rate required for a 50-ft overhead irrigation kit is 5 GPM and for a 100-ft kit 10 GPM are required. To determine what your flow rate is in gallons per minute (GPM), at the point where you connect your supply line or hydrant to the irrigation system time how long it takes to fill up a 5-gallon bucket in seconds using a stopwatch. Then divide 5 by the time in seconds it took to fill your bucket and multiply that result times 60. That number is your flow rate in GPM.
(5 gal ÷ time in seconds) x 60 = gallons per minute
Solution:
#1: Contact a local plumber or irrigation specialist to determine if it is possible to increase your flow rate.
Check your Water Pressure
The dynamic pressure required to operate all sprinkler heads is 32 psi. To check your dynamic psi, at the point where you connect your supply line or hydrant to the irrigation system install a y-valve. Attach a water pressure gauge on one side and open both valves. The reading on the gauge will tell you your dynamic water pressure.
If you have less than 32 psi, your sprinkler heads may not emit water at all, or they may only open some.
Solutions:
#1: Check all system components for kinks or leaks and reposition, repair, or apply thread tape where necessary.
#2: Do you have multiple irrigation kits running at the same time? If so, you may be able to increase your pressure by only running one system at a time.
#3: Remove every other sprinkler head. This may give you the pressure needed at an acceptable coverage uniformity. This means that you will need to run the system longer to achieve similar results.
#4: Verify the size of your supply line from the hydrant to the irrigation system. We recommend no less than a 3/4-inch supply line. If you are using a garden hose, make sure that is a true 3/4-inch hose and not anything smaller.
#5: Verify the dynamic pressure at the hydrant where you connect your supply line to, if you have one (you may have your hydrant connection point right at the irrigation system). If the pressure is significantly higher at the hydrant when compared to your supply line end, then your flow rate may be too high for the diameter of the supply line you have. The attached friction loss charts can be helpful in determining the correct supply line diameter. You will need to know your flow rate in GPM (far left column) and select the pipe diameter that keeps you in the white and out of the grey on the table.
Note: The friction loss chart is for 100-ft lengths of pipe.
#7: Purchase lower PSI check valves with Farmers Friend that opens up at 28 psi by contacting customer service. These are not as high of quality as the ones we sell with the kits, but they could be a more affordable solution.
#6: Install a water pressure booster pump. These systems vary in cost, but a local plumber or irrigation specialist should be able to help you select one and install it.
Hopefully, one of the solutions above solved your problem. If not, feel free to contact us at our Help Center for further guidance.
- Open the full article
The 100’ Kit Includes:
• 1 x 15’ Black Polyethylene Tubing, 1”
• 1 x 100’ WhiteTM Polyethylene Pre-Punched Tubing, 1”• 32 x Hanging Sprinkler Assemblies (12”)
• 32 x SpinNet Sprinkler Heads (R-R-BL)
• 100 x Black UV Stabilized Nylon Cable Ties— 11”, 50 lb.
• 2 x PVC 1” insert 90 degree elbow
• 1 x PVC Flush Valve
• 1 x PVC Hose Adapter
• 1 x 3/4” PVC ball valve
• 1 x 3/4”-120 Mesh Manual Disk Filter • 1 x 3/4” Pressure Regulator 35 PSI• 2 x 10-pack Goof Plugs
The 50’ Kit Includes:
• 1 x 15’ Black Polyethylene Tubing, 1”
• 1 x 50’ WhiteTM Polyethylene Pre-Punched Tubing, 1”
• 16 x Hanging Sprinkler Assemblies (12”)• 16 x SpinNet Sprinkler Heads
• 100 x Black UV Stabilized Nylon Cable Ties— 11”, 50 lb.
• 2 x PVC 1” insert 90 degree elbow• 1 x PVC Flush Valve
• 1 x PVC Hose Adapter
• 1 x 3/4” PVC ball valve
• 1 x 3/4”-120 Mesh Manual Disk Filter • 1 x 3/4” Pressure Regulator 35 PSI• 1 x 10-pack Goof Plugs
- Open the full article
• 1 x 15’ Black Polyethylene Tubing, 1”
• 1 x 1500' drip tape
• 10 x Metal Staples• 12 x Drip Tape Valves
• 12 x End Closures
• 10 x Repair Couplers
• 1 x Header Flush Valve
• 1 x 10-pack Goof Plugs
• 1 x Elbow
• 1 x 8mm Plastic PunchComplete Kit Also Includes one of the following:
1 x Screen Filter/ Manual Valve Assembly
1 x Screen Filter/ Automatic Valve Assembly
1 x Disc Filter/ Manual Valve Assembly
1 x Disc Filter/ Automatic Valve Assembly
- Open the full article
5 x Xcel Wobbler HA with lavender nozzle OR 5 x Maganet Green head
2 x Road Guard (optional if using Meganet heads)
1 x Flush valve
1 x Hose Adapter
1 x 100' Black Polyethylene Tubing, 1"
5 x Female x Barb Connector for Sprinkler Stand
1 x Hole Punch
5 x Stake Adapter
5 x Sprinkler Stand
5 x 48" Stakes
- Read the full article
Overhead
1. Filter Assemblies (Optional)
-
Screen filter- city water
-
Disc filter- pond, creek, spring
2. Valve/Pressure Regulator Assemblies (Optional)
- Manual or automatic valve with 35 psi pressure regulator
3. Flow per Sprinkler Line (GPM)
50-ft 4.9 gpm 100-ft 9.8 gpm
4. Pressure Regulator at 35 psi
- Flow Range: 5 to 17.6 gpm
- Unit Size:3⁄4″
5. Supply Line Requirements
- 3⁄4″ diameter or greater supply line works best
- 1″ diameter or greater supply line works best
6. Water Pressure Requirements
- At least 30 psi
7. Automatic Irrigation Controller
- Power supply: 9‑volt battery, included
- Programs:
- Once a day at the same time every day. (Factory preset 15 minutes at 6:00 am)
- Once a day at the same time on selected active days
- Up to three start times per day on selected days
- Extra modes:
- Stop all irrigation activities
- Manually start a program with the option to manually or automatically stop active program
- Backup: On-board flash memory to safeguard settings
- Operating Temperature: 32° – 122°F (0° – 50°C)
- Storage Temperature: 14° – 140°F (-10° – 60°C)
Drip Irrigation
What do you need to make a kit?
- 20′of header line for irrigating up to 5, 30″ beds
- Hardware for 12 lines of drip irrigation for watering up to six 30“ beds @ 2 lines/ bed
- 1500’ of drip tape
- Filter (screen/ disc), valve (automatic/ manual), and pressure regulator
Drip Line Specs
Lite Duty
Heavy Duty
Wall thickness
8- mil
12- mil
Max Pressure
17.5 psi
40 psi
Inner Diameter
0.638 in
0.636 in
Emitter Spacing
12 inches
Flow Rate
0.23 gallons per hour at 10.0 psi
0.42 gallons per hour at 10.0 psi
Field Irrigation
Please see attached documents for the specs of the sprinkler heads.
Wobbler Features
- Counter-balance reduces vibration for a smooth, stable performance
- Only one moving part – which translates to longer life
- Connections: 3⁄4″ or 1⁄2″ NPT male
- Flow rates: 0.78 to 6.97 gpm (177 to 1583 L/hr)
- Operating pressures: 10 to 25 psi (0.69 to 1.72 bar)
- Low wind drift and evaporative loss at low pressures
- Two-year warranty on materials, workmanship and performance
- Color-coded nozzles for easy size identification. Warranted to maintain correct orifice size for five years
Meganet Features
- Perfectly balanced sprinkler with two equal water jets — no wobble.
- Robust design is closed and compact preventing insect penetration and protecting internal parts.
- Excellent distribution uniformity.
- Install on solid sets or in removable field stands.
- Each unit has an individual filter for nozzle cleanliness and to simplify cleaning.
- Color-coded for easy identification.
- UV protected materials are durable in all climates.
- Resistant to fertilizers and chemicals.
- Optional MegaStand™ for leak-proof connection to FlexNet™ flexible pipe.
-
- Open the full article
The inner diameter is 1" and the outer diameter is 1.2".
- Open the full article
NETAFIM Disc Filter Tech Specs 3/4"
Flow Range
1-12 GPM
Maximum Pressure
140 PSI
Filtering Surface Area
25 sq. in.
Filtering Volume
5.8 cu. in
Length
5 22/32”
Width
7 15/32”
Weight
.66 lbs
Distance between Ends
6”
Microns 140-160 Inlet/Outlet
3/4” Male
- Open the full article
Max psi for the Black or White Poly 1 Inch tubing is 49 psi. Minimum psi to operate the Overhead is 32 psi.
- Read the full article
How to troubleshoot flush valves not closing
Purpose of flush valves
A flush valve helps keep your irrigation system clean by clearing out dirt and debris that can clog the emitters. As the system is pressurizing the valve lets water flush out any buildup, ensuring your plants receive even watering. After the sytem is pressurized, the flush valve can be manually flushed by pushing the nipple back in.
Drip tape flush valves are generally only used on drip tape that is intended to be used multiple years. For single year use drip tape there are other options such as z-folds and end closures.
Reasons flush valves do not close properly
Sometimes the flush valve is clogged with some type of debris that made it to the end. This could be a small piece of grass or a tiny pebble. Other times, the issue is that the water supply does not have enough pressure or the flow rate is not high enough to support the system. Below are how you would handle each situation.
Solutions for flush valves not closing
When the flush valve is clogged, you can manually clear the debris by pressing the nipple on the end back into the housing. If the debris is too large, you may need to remove the flush valve and clear the debris from the back side.
In the case that your water supply does not have enough pressure or flow rate, the easiest solution is to replace the flush valves with z-folds or end closures. Because drip irrigation generally is a low pressure and low flow requirement system, simply replacing the flush valves fixes the problem.
If you want to keep the flush valves, a more time consuming solution is to manually turn each drip line valve on one at a time as they pressurize. A similar solution is to create a new zone with a separate header line and timer. This solution would allow you to keep the flush valves if you desire and automate the process. You will find it helpful to know your flow rate if you pursue the most complex and costly solution
You will need two pieces of data. One, you will need to know the flow rate of your water supply. To determine this, time how long it takes to fill a five gallon bucket with water from your water supply in seconds. Then make a copy of this file so you can edit the Google Sheet and input that time in cell A2 of the Flow Rate Calculator tab.
Next, you will need to know the what your total system requires in terms of flow rate in gallons per minute. On the same Google Sheet, edit the cells outlined in red with the information of your system.
Once you know what your water supply and drip system GPM is, you will need to update do some simple math. For example, if your water supply flows at a rate of 4 gallons per minute, and your drip system requires 7 gallons per minute, you will need two zones. That is because your water supply can only supply half of what the drip system requires.
Conclusion
Drip tape flush valves are a great product that extends the life of drip tape. When problems are encountered with them not working properly, focusing on the most simple solutions is recommended. Below is a bullet point summary for reference.
Purpose of flush valves:
-
Clears dirt and debris from drip tape, ensuring consistent watering.
-
Manually flushed after pressurizing by pushing the nipple back in.
-
Typically used for multi-year drip tape systems.
Reasons flush valves don't close:
-
Clogs from debris like grass or pebbles.
-
Low water pressure or insufficient flow rate.
Solutions:
-
For debris: Manually clear by pressing the nipple or removing the valve to clean.
-
For low pressure/flow: Replace flush valves with z-folds or end closures.
-
More advanced: Manually pressurize drip lines or create separate zones with a header line and timer.
Flow rate tips:
-
Measure water supply flow rate using a bucket and calculate drip system requirements.
-
Adjust system zones if water supply can't meet system demands.
-
We also recommend…


Drip Irrigation Basic Hardware Kit
12-Line Kit
Product Reviews
Review data
5 star reviews
- 100%
4 star reviews
- 0%
3 star reviews
- 0%
2 star reviews
- 0%
1 star reviews
- 0%
Recent reviews
Great Products
5 out of 5 stars
Farmers Friend is my go to for my market garden! So helpful on the phone as well!