How to Use a Greens Harvester: Tips for Cleaner Cuts and Better Second Harvests
By Jonathan Dysinger and John Dysinger
Updated on
Show Transcript
0:00Hi guys, Jonathan here with Farmers Friend and I'm at Bountiful Blessings Farm with my dad John and we are going over questions that have been submitted
0:06by our customers. We have a a question from Ricky. He says, "I saw your recent email highlighting the greens harvester.
0:14Can you create a video tutorial showing how to use it? Share the crops you find it works best for. Can you get a second cutting on crops and maintain quality?
0:23If so, which crops work best for the second cutting, and which should we expect just one cutting?" So, it's a good point. We need to do a more
0:31dedicated video on how to how to use the greens harvester. There's quite a bit of footage out there on using it, but I
0:39don't know. Do you want to talk about this at all as far as like the the cut and come again? I mean, I think that the from from my perspective, the reality is
0:48that second cutings are never as good as first cutings, no matter how you do it,
0:52but it is possible. A lot of people use the quick cut greens harvester to get second cutings. And we've been told by
0:59um you know by people in the space I'm trying to remember I think even Elliot said that the second cut quality with
1:06the greens harvester was higher quality than what they were able to accomplish by hand harvesting. So um that's that says something about the greens
1:13harvester. It does leave a very clean cut. You don't end up with a lot of um a lot of greens dropped. That's the big thing is if you're cutting and you're
1:22dropping greens, that's just going to uh going to rot and and cause decay and definitely you got to get that stuff out
1:31of there somehow. You know, make sure the bed is clean. Some kind of leaf rake or something that you can just gently
1:38rake out any dead stuff cuz that'll definitely mess you up. Yeah. Um, you know, I think the best video
1:46tutorial I've seen is Curtis Stone. You know, until you all come out with an
1:52official one. Um, Curtis was the most adept at using the quick cut greens
2:00harvester of anybody I've seen. Very fast. And and um, so I'm sure you can find that out there somewhere.
2:09um until Farmer's Friend comes up with their official version.
2:14Yeah. Um but yeah, you know, as far as second cut, I second everything that uh
2:22you have said. Um that your your quality decreases with every cut. Uh in the
2:31summer, we never do second cuts. in the winter, in the cooler weather, you can
2:38get by with it if you need to. Most people I know, most market gardeners that I know actually don't do second
2:46cuts. Uh, you know, but it's nice you you have that option if you need it, you know, in an emergency kind of situation.
2:56Um, and again, you can get away with it more in the cooler weather like your arugula. You know, it doesn't get as
3:04spicy and tough as quick. So, you can get by with a second cut sometimes. You know, as far as which
3:12crops work best for second cutting, h I don't know. I, you know, I think there's a lot of variables there
3:21that it would be hard to say exactly which ones work best. I I know some people use the quick cut on
3:30spinach. Yeah. Um I was going to say I think spinach would probably be the hardest one to get a good second cut.
3:37Yeah. Um it's it's hard enough to get a good first cut with a quick cut. you have to grow it really densely and get and get varieties that grow more
3:45vertically rather than uh you know spreading out. So spinach is probably a good example of one that would be
3:52difficult to do a second cut. Um arugula and you know things like maybe um baby baby kale and stuff like that.
4:02Yeah, baby kale I think works quite well with a second cut.
4:08Um, yeah, you really just have to experiment. Of course, originally the quick cut was designed thinking of baby
4:17lettuce, but now most market gardeners are are growing um salenova,
4:23which you know, so there's I I don't know a lot of people that are growing baby lettuce.
4:29It works great with it obviously, but it's still necessary for your arugula,
4:36your mazuna, your tats soy, your baby kale, whatever other baby greens you are
4:43growing. A couple things I would say just mention quickly. So, first of all,
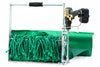
4:49I think it's important to mention keeping the blade really sharp, keeping a a good sharp blade on your greens harvester. Um, we do have some videos on
4:57how to sharpen the blade. The reality is it's kind of almost impossible to to get the blade as sharp as a brand new
5:05factory edge. Um it's just a serrated blade is is inherently challenging to sharpen. But you want to make sure you have a a good sharp blade at all times.
5:16And then the other thing um that I was going to mention is as far as technique,
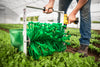
5:22the the best way to to harvest effectively and and keep a nice clean bed is to do a kind of a a sweeping
5:31action where you you run the harvester down the bed a couple feet and then you kind of lift back and up a little bit to let that basket, the fabric basket kind
5:40of drop down and let the greens flip back into the basket. And then you go and cut a few more feet. and and how frequently you have to do that kind of
5:48lifting action depends on how dense the crop is. If it's a really light crop,
5:52you know, maybe something like like baby kale that's just not super dense and it's really kind of frilly, the brush itself may do a good enough job flipping
5:59those greens back into the basket. But if it's a really dense crop of something like arugula, um the farther you go, the
6:07more that the the harvested cut greens are going to kind of bunch up there right behind the blade under the brush.
6:13And then if you keep continuing to go on that that kind of in inhibits that cut and the greens being able to work their way back into the basket. The best way
6:21to get a really clean uh effective cut is just to do an action where you're going a couple feet, lifting up and tilting back as you're still maintaining
6:30your hand on the trigger, keeping that brush running, and then keep going.
6:34Again, just kind of that uh swooping action, I would say. So, there's videos out there that demonstrate that. We'll try to put together an official Ivy.
6:41We've only been doing this for the official video. We've only been doing this for 13 years now or something. So,
6:47we we should probably do that uh sooner than later. We got one on sharpening the blade, but not on how to use it. So, yeah. So, anyways, our bad on that.
6:55Thank you for bringing our attention to that, Ricky. And any of you watching, if you have other questions, uh even if they're super obvious, like do a
7:03tutorial on how to use the greens harvester, we want to hear it. Maybe we'll discuss it in a future video. I I would just say, you know, from our
7:10experience, forget trying to to sharpen the old blades. It's just, you know,
7:16your time is valuable and, you know, the blade, I don't know what the current price is, but they're not that expensive. Yeah. We've tried to get the
7:24price down to where people can just do that. You know, just put a new blade on.
7:28You don't want to fool with a a half sharp blade. Yeah. And and the reality is they will stay sharp a long time if
7:35you keep them out of the dirt and and protected. And so yeah, keep it out of the dirt, keep it protected, and replace it when it gets dull. Until next time,
7:45happy growing.
The key to effective greens harvesting with a mechanical harvester is a sweeping technique — cut a couple of feet, then lift and tilt back to let the greens drop into the basket before continuing. Second cuts are possible but quality always decreases with each pass; they work best in cooler weather on crops like arugula and baby kale, and are hardest on spinach. Keep your blade sharp (or just replace it when it dulls) and keep it out of the dirt to maximize blade life.
A customer named Ricky recently asked us a question that we should have addressed with a dedicated tutorial years ago: how do you actually use the Quick-Cut Greens Harvester effectively, which crops work best with it, and can you get a quality second cutting?
We've been making and selling this tool for 13 years now and still haven't produced an official technique video — so we owe Ricky a thank-you for holding our feet to the fire. In the meantime, my dad, John Dysinger, and I sat down to cover the essentials in a recent video, and here's what you need to know.
What Is the Proper Technique for Using a Greens Harvester?
The biggest mistake new users make is running the harvester straight down the bed in one continuous pass. That works on very light crops, but on anything dense, the cut greens pile up behind the blade and under the brush, blocking the next greens from feeding cleanly into the basket. You end up with a messy cut and dropped greens on the bed — which is exactly what you're trying to avoid.
The Sweeping Technique
The most effective method is a rhythmic sweep-and-lift action:
Run the harvester down the bed for a couple of feet, then lift the back end up and tilt slightly backward — all while keeping your hand on the trigger with the brush still running. This motion lets the accumulated cut greens drop back into the fabric basket. Then set back down where you left off and cut another couple of feet.
How frequently you need to do this lifting action depends on the density of the crop. A light, frilly crop like baby kale may feed through smoothly with the brush doing most of the work. A dense crop like arugula bunches up fast and needs more frequent lifts.
The goal is a clean bed surface behind you with minimal dropped greens. Any greens left on the bed will rot and cause decay issues — especially problematic if you're planning a second cut. If you do see dropped material, a gentle pass with a leaf rake to clean the bed surface is worth the extra minute.
For those wanting to see this technique in action, Curtis Stone has some of the best video footage of the Quick-Cut Greens Harvester in use. He's one of the most adept operators we've seen — very fast and very clean. Look up his content until we get our official tutorial produced.
Can You Get a Second Cutting with a Greens Harvester?
Yes — but with realistic expectations.
Second cuttings are never as good as first cuttings. That's true no matter how you harvest, whether by hand or by machine. The regrowth is less dense, the leaves are often smaller, and the overall quality drops.
That said, the Quick-Cut Greens Harvester leaves a cleaner cut surface than most hand-harvesting methods, which actually gives second cuts a better starting point. Even Eliot Coleman has noted that second-cut quality with the greens harvester was higher than what his team could achieve by hand. The clean, even cut means less tissue damage and less decay, which gives the regrowth a better foundation.
Farm Smarter, Not Harder
Join thousands of market farmers receiving regular insights on how to streamline your systems, save your back, and increase your farm’s bottom line.
When Do Second Cuts Work?
Cooler weather is key. In the winter and shoulder seasons, second cuts are a viable option if you need them. The slower growth and lower temperatures mean less rot and better quality regrowth.
In summer, skip it. My dad never does second cuts in the heat. Everything decays too quickly, and the quality drop is too significant to be worth it.
Most market gardeners my dad knows don't routinely do second cuts — they replant instead, which gives higher quality and more predictable yields. But it's a useful option to have in your back pocket for emergencies or when you need to stretch a planting further than planned.
Which Crops Work Best for Second Cuts?
Arugula — One of the better candidates, especially in cooler weather. It doesn't get as spicy and tough as quickly, so a second cut can still be marketable.
Baby kale — Works quite well for a second harvest. The regrowth is typically clean and usable.
Mizuna, tatsoi, and other Asian greens — Generally good candidates for cut-and-come-again harvesting.
Spinach — Probably the hardest crop to get a good second cut on. It's already challenging to get a clean first cut with a mechanical harvester — spinach needs to be grown very densely with varieties that grow vertically rather than spreading out. A second cut amplifies all of those challenges.
Baby lettuce — The harvester was originally designed with baby lettuce in mind, though most market farmers have shifted to growing Salanova heads instead. For those still growing baby lettuce mixes, the harvester works beautifully.
Bed Cleanup Between Cuts
If you're going for a second harvest, bed cleanliness is critical. After the first cut, go through and rake out any dropped greens, dead leaves, or debris. Rotting material on the bed surface will contaminate your regrowth and kill quality fast. A quick pass with a leaf rake is all it takes, but don't skip it.
How Do You Maintain the Blade?
Blade sharpness is everything with a greens harvester. A dull blade tears instead of cutting, which damages plant tissue, reduces quality, and makes second cuts nearly impossible.
Keep It Sharp — Or Just Replace It
Here's my dad's honest advice: forget trying to sharpen old blades. The serrated blade is inherently difficult to sharpen, and it's nearly impossible to get it back to factory-edge sharpness at home. Your time is more valuable than the cost of a new blade.
We've worked to keep replacement blade prices reasonable for exactly this reason. When the blade gets dull, swap it out. A sharp blade makes everything work better — cleaner cuts, less dropped material, less tissue damage, and better second-cut potential.
Blade Longevity Tips
A blade will stay sharp for a surprisingly long time if you follow two simple rules:
Keep it out of the dirt. Soil is abrasive and will dull the edge faster than anything else. If you're cutting too low and hitting soil, raise your cutting height.
Keep it protected when not in use. Don't toss the harvester in the back of a truck bed where the blade can bang against other tools. A little care in storage goes a long way.
The Takeaway
The Quick-Cut Greens Harvester is a time-saving powerhouse for baby greens production, but technique matters. Use the sweep-and-lift action for clean cuts, keep your blade sharp (or just replace it), and clean the bed surface thoroughly if you're going for a second harvest.
Second cuts are possible and can be worthwhile in cooler weather — especially on arugula and baby kale — but they're never as good as first cuts. Most experienced growers replant rather than routinely relying on second harvests. Think of cut-and-come-again as a useful emergency option, not your default strategy.
Frequently Asked Questions
Use a sweep-and-lift action: cut a couple of feet, then lift the back of the harvester up and tilt back while keeping the brush running to let greens drop into the basket. Resume cutting where you left off. How frequently you lift depends on crop density — dense crops like arugula need more frequent lifts than light crops like baby kale.
Yes, but quality always decreases with each cut. Second cuts work best in cooler weather on crops like arugula and baby kale. In summer, the quality drop is too significant to be worthwhile. Most experienced market gardeners replant rather than routinely relying on second cuts, but it's a useful option when you need to stretch a planting.
The harvester works well with arugula, baby kale, mizuna, tatsoi, baby lettuce, and other baby greens. Spinach is the most challenging — it needs to be grown very densely with upright-growing varieties for a clean cut. The tool was originally designed for baby lettuce but is now used across a wide range of greens crops.
Replace the blade when cuts start looking torn rather than clean. Frequency depends on usage volume, but a blade can last weeks if you keep it out of the dirt and store it properly. Sharpening serrated blades at home is difficult and rarely restores factory-edge quality — replacement blades are affordable and a better use of your time.
After the first harvest, rake out any dropped greens, dead leaves, or debris from the bed surface. Rotting material will contaminate regrowth and destroy quality. A quick pass with a leaf rake is sufficient. Then let the crop regrow and harvest the second cut slightly higher than the first to get only new growth.
Yes — the harvester leaves a cleaner, more even cut surface than hand-harvesting with knives or scissors, which gives regrowth a better starting point. Even Eliot Coleman has noted that second-cut quality with the Quick-Cut Greens Harvester was higher than what his team achieved by hand.
Shop Related Products