How to Mark Beds and Transplant Efficiently on Your Small-Scale Farm
By Jonathan Dysinger and John Dysinger
Updated on
Show Transcript
0:00We have a bed here that's ready for planting. And so in this video, we're going to be showing the process for marking out the bed and planting using a couple of different techniques. So,
0:08what's the first step? Well, I like to this is where I I definitely like to have the string line. So, we just roll
0:16that out, tie that off. Then, we've got a couple options here. Of course, you
0:24can, you know, if you're really on a budget, you can just move your string and use your string to mark your rows
0:34and just use like a rake or something or something like
0:41the zipper or Johnny's has their own version of this that you can just use to
0:49mark your bed this way. That's a lot more work, but it's doable. Just kind of eyeballing it,
0:58it would definitely encourage if you are in this for making money that you want
1:06to go the next step, and the next step would just be to use your standard 30-in bed rake.
1:14And you have these uh pieces of PEX pipe that you just put over at
1:23whatever spacing you're wanting. Follow your string line down the bed.
1:31And then you can come back and do your cross grid. And that's a lot faster and
1:37more accurate. You need a 30-in bed rake anyway. You can go to the the hardware
1:44store and buy two feet of PEX pipe and have all of these you need. The fastest
1:52way to mark a bed would be with some kind of gritter. And
1:58these are available from either never tools or Johnny's has one that goes on the conne.
2:09And so this is a Neverink tool gritter with a custommade handle from Caleb.
2:16Yes, your little brother is becoming a welder fabricator.
2:21It's got this nice little marker that you just put above your string there and
2:28just roll it out. One of the downsides with the gritter is you kind of have to have a dedicated gritter for each different spacing layout that you're
2:36going to be Well, you don't have to. I mean, you can switch them out, but that's always a pain. And so, that's why Caleb came up
2:46with the the handle. So, we have we have a separate gritter for every spacing. Now,
2:53okay. How many different spacings do you have gritters for?
2:59I I mean pretty much the two we call this the two one because it's got two
3:07wheels marking the corners and then three and four. Okay,
3:13those are the main one. We do have the five one as well.
3:16But this is not necessarily just you could use this gritter for many different spacings, right? Because it's just giving you reference. So you could
3:23do one on the cross but one in between or one in between here. Yeah, it's I mean reference line.
3:30There's so many ways you could go, you know, you could do uh a five dice. You know, you can think of
3:39this as a dice and do something like that. You know, you can do nine.
3:46So yeah, you just think of this square as your dice and you're trying to do
3:53them evenly spaced apart. So we're talking about fall planting here and all
4:01our bronas are planted. So I actually literally scred this off the compost.
4:08Okay. Oh, they still look like they're they're plantable. You know, this is a
4:14good size. I'm pretty sure this is uh well, I was gonna say collards, but it
4:23could be cabbage, I guess. So, we like to plant our cabbage close. Normally,
4:32um for big heads, they would say two rows 18 in apart. Well, this gritter
4:40does 15 in, but that's close enough. So I would do something like this
4:49stagger. You know, this side would be on the grid and this other side would be in the middle.
4:57So 15 15 in apart staggered.
5:00Yeah. And that's going to give you big heads. Yeah.
5:04What we have found for our market clientele, you know, they don't know what to do with a a huge head of
5:12cabbage. So we plant them three three rows per bed basically. Wow.
5:19Um 10 inches apart. So we use the three gritterder which is uh yeah 10 in spacing.
5:28Um and and that'll make these small heads that people feel are manageable.
5:35So at this point, if your soil is a little harder,
5:41this right angle T from Glosser is is really handy. And you're just,
5:50you know, you don't have to be fussy with them. Just you're just trying to cover the the um root ball.
6:02But if your soil's good, it's a lot faster just to use your fingers. Just
6:09use two fingers and that's it. You know, you get them planted. Um,
6:20if you want if you have the insect netting to cover them, that's always good just to keep the worms off the well
6:29keep the the butterflies off so they don't get the worms. Or um,
6:38you know, if if you haven't hardened them off, you can cover them like with a row cover or something for a day or two.
6:46That's kind of a little bit of a transitional period. Um,
6:52so for a crop like this, bras going in in the fall, weed pressure is going to be a lot less. So, not as much of a concern maybe, but um, you know,
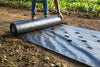
7:03recommendation would be to think about putting down uh, landscape fabric or we,
7:07you know, quick plant fabric that we sell um, with the pre burned holes in it just to eliminate that that weed pressure.
7:16um eliminate splash. If it's outside crops, you eliminate the dirt splatter up on the on the crops. So, something to
7:24think about as well. But if you're planting into bare soil like we are here, this is the process that uh we
7:31utilize for marking the rows and planting. Any other last tips? Yeah, one little trick with with fall brassica,
7:40it's not a trick, but just a tip that uh we do, and that this is why we do our fall bras into bare soil. As Jonathan
7:50said, there's uh less weed pressure. But what we'll do is cultivate for a couple weeks, two or 3 weeks until the plants
8:00are a little bigger, you know, say foot tall or something. And then we'll come back and we'll sew crimson clover. And
8:09the crimson clover will germinate and grow under the brasacas. Mhm.
8:15And by the time the brassacas are finished mid- winter,
8:20um the crimson clover has taken over underneath and come spring you get a nice crop. So it's kind of uh the market
8:29gardener's version of having your cake and eating it too. And well, and the clover is a beneficial crop that's putting nutrients, nitrogen into the soil, right?
8:38Yeah. It's a a leguminous cover crop,
8:41so you're not worried about it vying for uh nutrition really.
8:45Well, I Yeah, that's a whole another subject, but um it it stays small enough
8:53and shallow rooted enough in the fall that you know, as long as the bronas have a good head start, it's not an issue.
9:01Yeah. Cool. That's a good pointer. All righty. Well, I hope this video has been helpful. If you have questions, put them down below and maybe we'll answer them
9:09in a in a future video like this. Until next time, happy growing.
There are three levels of bed marking speed: a string line moved by hand (cheapest but slowest), a 30-inch bed rake with PEX pipe spacers (fast and affordable), and a dedicated grid roller like the Neversink gritter (fastest). For transplanting into bare soil, two fingers are quicker than any tool if your soil is loose. The pro tip: sow crimson clover between fall brassicas two to three weeks after planting — it grows underneath the crop as a living mulch, suppresses weeds, and fixes nitrogen, so by mid-winter you have a cover crop ready to take over when the brassicas come out.
Planting day is where all your propagation work meets the field — and having a fast, consistent system for marking rows and getting transplants in the ground makes a real difference in how many beds you can plant in a day.
In a recent video at Bountiful Blessings Farm, my dad, John Dysinger, walked through the marking and planting techniques they use, from the bare-minimum budget approach to the fastest professional setup. He also shared a fall brassica interplanting trick that's one of the smartest things they do on the farm.
How Do You Mark Rows on a Bed?
Budget Option: String Line and Rake
If you're just getting started, a string line is all you need. Tie it off at both ends of the bed, use it as a guide to mark your first row with a rake or pointed tool, then move the string to mark the next row. It works — it's just slow and requires a lot of repositioning.
For the cross-grid (spacing plants within the row), you can use a tool like the Johnnys bed preparation rake or just eyeball it with consistent steps.
Mid-Level: Bed Rake with PEX Pipe Spacers
This is the sweet spot for most growers. Take a standard 30-inch bed rake — which you need anyway for bed prep — and slide short pieces of PEX pipe over the tines at whatever spacing you want. Run it down the bed following your string line to mark all your rows in one pass. Come back perpendicular for the cross-grid.
It's significantly faster and more accurate than moving a string multiple times. The PEX pipe costs a couple of dollars at any hardware store and takes minutes to set up.
Fastest: A Grid Roller (Gritter)
For maximum speed, a grid roller — like the Neversink Tools gritter — rolls down the bed and marks your entire planting grid in one pass. At Bountiful Blessings Farm, my brother Caleb welded custom handles so they can keep a dedicated gritter set up for each spacing pattern (two-row, three-row, four-row, and five-row layouts), eliminating the time spent swapping wheels between spacings.
The trade-off: you ideally want a separate gritter for each layout you use regularly. Switching wheel positions between spacings is doable but fiddly. If you grow enough volume to justify the investment, dedicated gritters save real time over a season.
A note on grid flexibility: Think of each grid square like the face of a die. A two-row gritter gives you the corners of the square, but you can plant in the center too for a staggered pattern. A three-row gritter at 10-inch spacing can work for tight plantings. The grid is a reference — you decide how to use it.
Farm Smarter, Not Harder
Join thousands of market farmers receiving regular insights on how to streamline your systems, save your back, and increase your farm’s bottom line.
How Do You Actually Transplant?
Once your grid is marked, planting is straightforward.
If your soil is loose and well-prepared: just use two fingers. Push them into the soil at each mark, drop the transplant in, and press the soil around it. No tool needed. This is faster than anything else when conditions allow it.
If your soil is harder or heavier: a right-angle trowel (like the Glaser model) lets you lever open a planting hole without as much hand strain. You don't need to be fussy — just cover the root ball and move on. These transplants don't need to be babied.
At Bountiful Blessings Farm, speed comes from not overthinking it. Mark the grid, grab your transplants, and plant. A bed goes in fast when you're not second-guessing every hole.
The Crimson Clover Interplanting Trick
This technique is one of the smartest things they do on the farm, and it's beautifully simple.
Here's the scenario: you're planting fall brassicas (cabbage, collards, broccoli) into bare soil in late summer. Weed pressure in fall is lower than summer, so you don't necessarily need landscape fabric. But you also don't want bare soil sitting between your plants for months.
The technique:
Plant your brassicas into bare soil. Cultivate for two to three weeks to keep weeds down while the transplants establish and get about a foot tall. Then broadcast crimson clover seed between the brassica rows.
The clover germinates and grows underneath the brassicas as a living mulch. It stays low and shallow-rooted enough that it doesn't compete with the established brassicas for nutrients — especially since clover is a legume that fixes its own nitrogen. By mid-winter, when you harvest the last of the brassicas, the crimson clover has filled in underneath and you have a ready-made cover crop that will keep growing into spring.
It's the market gardener's version of having your cake and eating it too — weed suppression, nitrogen fixation, and a cover crop, all from one seeding between your cash crop rows.
What About Weed Prevention?
For fall brassicas specifically, weed pressure is lower, which is why bare-soil planting works. But if you want to eliminate weeding entirely, Quick-Plant Fabric with pre-burned holes is always an option. The fabric also keeps soil from splashing up onto your crops during rain — which matters for leaf crops heading to market.
The trade-off with fabric is that you can't do the crimson clover interplanting trick, since the fabric covers the soil. So it's a choice between two good strategies: fabric for zero weeding, or bare soil with interseeded cover crop for soil building.
Spacing Tips for Cabbage
One detail from the video worth highlighting: at Bountiful Blessings Farm, they've found that their market customers prefer smaller heads of cabbage. The standard recommendation is two rows at 18-inch spacing for full-size heads. But they plant three rows at 10-inch spacing, which produces smaller, more manageable heads that sell better at farmers markets and in CSA boxes.
This is a good example of letting your market — not the seed catalog — dictate your spacing decisions.
The Takeaway
A fast, consistent bed marking and planting system saves time on every single planting across your entire season. Start with a string line and bed rake if you're on a budget. Upgrade to a grid roller when volume justifies it. Plant with your fingers when the soil allows it. And try the crimson clover interplanting trick on your fall brassicas — it's one of those rare techniques that gives you weed suppression, soil building, and a cover crop all from one pass with a seed spreader.
Frequently Asked Questions
A grid roller (like the Neversink gritter) marks your entire planting grid in one pass. For a mid-budget option, a 30-inch bed rake with PEX pipe spacers marks all rows simultaneously. The cheapest method is a string line repositioned for each row, but it's the slowest.
If your soil is loose and well-prepared, two fingers pushed into the soil at each grid mark is faster than any tool. Drop the transplant in, press soil around the root ball, and move on. For harder soil, a right-angle trowel like the Glaser model opens planting holes with less hand strain.
Plant fall brassicas into bare soil, cultivate for 2–3 weeks while transplants establish, then broadcast crimson clover seed between the rows. The clover grows as a living mulch underneath the brassicas, suppresses weeds, fixes nitrogen, and becomes a ready-made cover crop by the time you harvest the brassicas in mid-winter.
Both work. Quick-Plant Fabric eliminates weeding entirely and keeps soil off your crops. Bare soil lets you interseed crimson clover as a living mulch and cover crop. Choose fabric if minimizing labor is the priority; choose bare soil if soil building is the priority.
Standard recommendations are two rows at 18-inch spacing for full-size heads. Bountiful Blessings Farm plants three rows at 10-inch spacing to produce smaller heads that sell better at farmers markets. Let your customer preferences guide your spacing decisions.
Shop Related Products